.svg)
.svg)
.svg)




How to Replace Keyboard on MacBook Pro
Your MacBook Pro keyboard starts acting up at the worst moment. A key repeats, a row goes dead, or the whole top case feels like it's fighting you, and the first instinct is usually to assume the keyboard has failed and needs replacement right away. Sometimes that's true. Just as often, the problem is a setting, a single damaged key, or a repair scope that's much bigger than a simple swap.
That distinction matters because replace keyboard on MacBook Pro can mean two very different jobs. On some models, it's a targeted fix. On many others, it turns into a top-case replacement with a lot of teardown in front of it, and that changes the cost, risk, and turnaround. Apple's butterfly-era machines made the issue especially notorious, with keyboard-related service events roughly doubling on the 2016 MacBook Pro compared with the 2014 and 2015 models in one dataset, and later models still showing higher failure rates in incomplete reporting (Notebookcheck).
If you're trying to decide whether to repair, replace, or live with the problem for now, the fastest path is to triage the symptom first, then match the model and service path to the actual failure. For a practical parts-and-service perspective, the Value Tools Co repair guide is a useful companion read before you open the machine or buy anything.
Table of Contents
- Is It Really the Keyboard You Need to Replace
- Diagnosing Key, Keyboard, and Software Issues
- What a Full MacBook Pro Keyboard Replacement Actually Involves
- DIY Replacement Prep and Common Pitfalls
- Apple, DIY, or Independent Repair Compared
- Why Your Model Determines the Real Repair Scope
- Choosing the Right Path for Your MacBook Pro
Is It Really the Keyboard You Need to Replace
A lot of owners blame the keyboard before they've ruled out the obvious. A dead-looking key can be a language input issue, a sticky key can be debris, and a whole row that seems unreliable can still turn out to be software behavior or an accessory problem. The smartest first move is to separate a key problem from a keyboard problem before you spend money on parts.
Start with the symptom pattern
If one key types the wrong character, look at input source and keyboard layout first. If a key registers only when pressed hard or from one side, that leans hardware. If several keys fail together, especially across the same area, the odds shift toward a deeper keyboard fault or a top-case issue.
A fast check takes less than five minutes:
- Unplug everything. External keyboards, hubs, and docks can hide the source.
- Test in another app. If the behavior is inconsistent everywhere, it's less likely to be a single software conflict.
- Watch for pattern damage. One isolated key usually means something very different from a whole cluster of failures.
Practical rule: don't order a keyboard before you know whether the problem follows the key, the system, or the hardware.
Check the model before you assume the repair
The model year changes everything. Butterfly-keyboard MacBook Pro units had a documented reliability problem that pushed many owners toward service and replacement programs rather than casual key repair, while older models may be more forgiving depending on the exact fault (Notebookcheck). If your MacBook Pro is under Apple's repair umbrella, that can change the path again.
That's why the right question isn't “How do I replace the keyboard?” right away. It's “What exactly is failing, and on which machine?” If you answer that first, you avoid buying the wrong part, booking the wrong service, or opening the laptop for no reason.
Diagnosing Key, Keyboard, and Software Issues
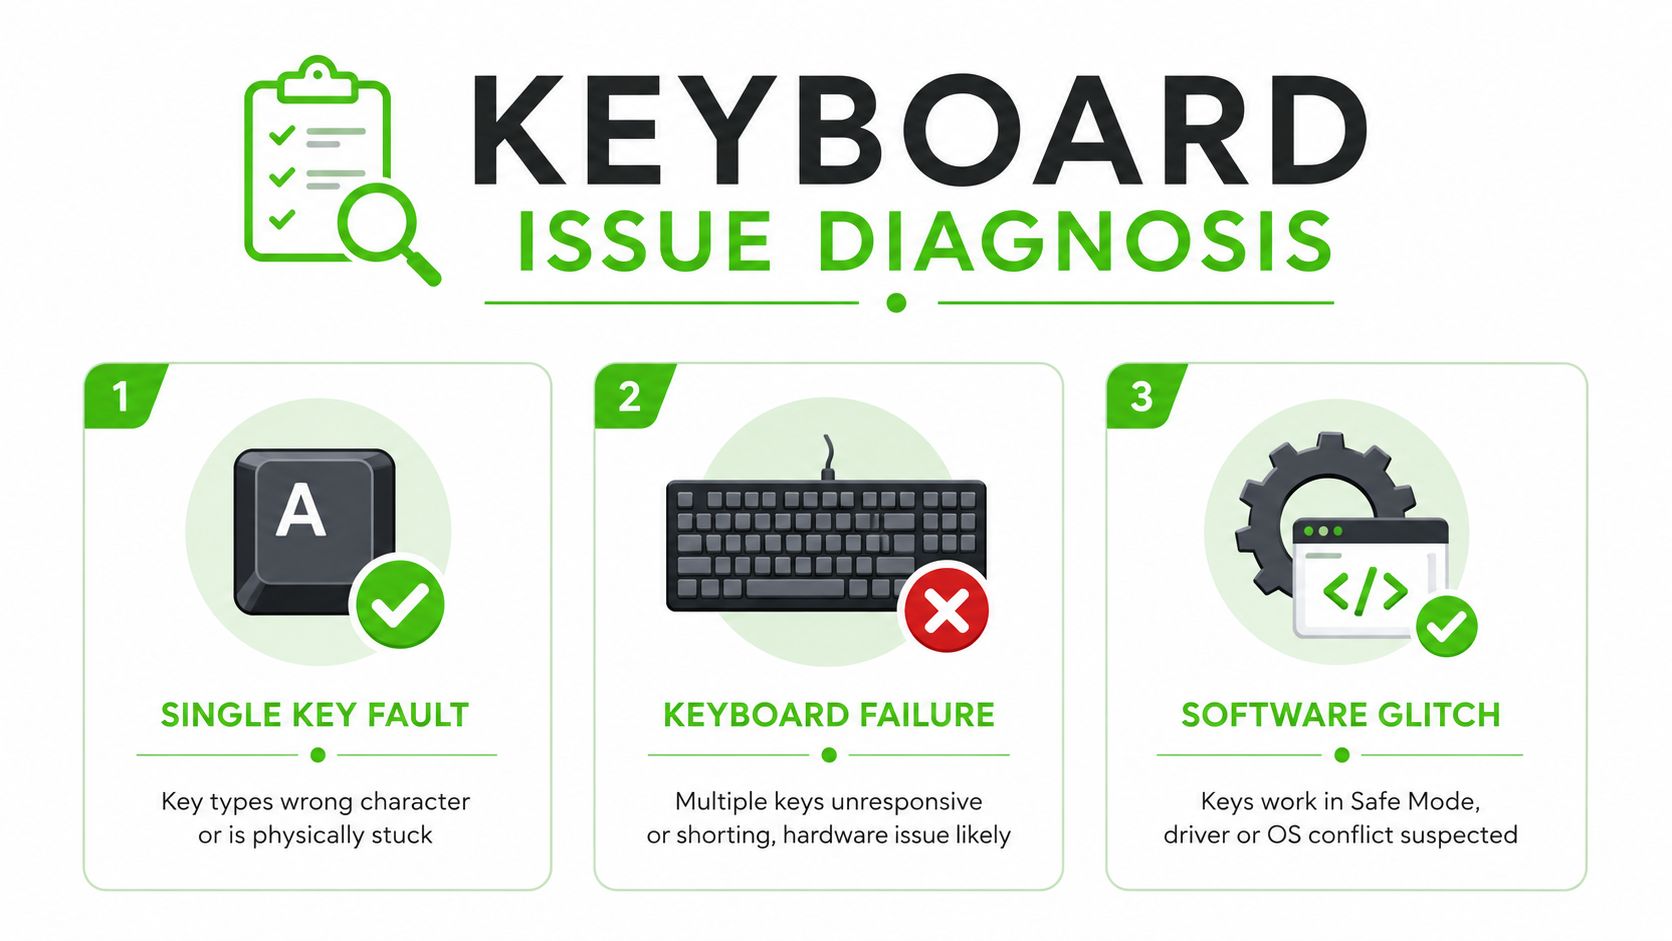
The quickest way to diagnose a MacBook Pro keyboard issue is to work from the outside in. Start with software settings, move to single-key behavior, then decide whether the whole keyboard assembly is failing. That order matters because a bad setting is free to fix, while a hardware replacement is not.
Software first, then hardware
If the wrong character appears when you press a key, check the current keyboard layout and input source. That kind of problem often looks like a hardware fault but isn't. Accessibility features can also change the typing experience enough to make a healthy keyboard feel broken, especially when Slow Keys or Mouse Keys has been switched on.
Run Apple Diagnostics if the keyboard seems broadly unreliable. If the machine gets through Diagnostics without pointing to a keyboard fault, that doesn't prove the keyboard is perfect, but it does help narrow the search. A software-related issue is also more likely if the keyboard behaves normally in Safe Mode or after recent settings changes.
The internal guide at this MacBook troubleshooting resource is helpful if you're trying to separate a real hardware failure from a setting issue without pulling the machine apart.
What the symptoms usually mean
A single dead key or a key that returns the wrong character often points to localized damage, debris, or a settings problem. A cluster of unresponsive keys usually suggests a larger hardware fault. A keyboard that works intermittently after a reboot, sleep cycle, or settings change often deserves a deeper look before replacement.
Keys that work in Safe Mode but fail during normal use are a clue that software is still in the mix.
The useful decision tree is simple. If one key is wrong, check settings and physical contamination. If several keys fail, assume hardware until proven otherwise. If the entire board behaves erratically, treat it as a replacement candidate and move on to the repair scope.
What a Full MacBook Pro Keyboard Replacement Actually Involves
On many MacBook Pro models, “replace the keyboard” really means replace the top case assembly. That's the part most owners don't expect, and it's the reason the job goes from annoying to mechanically dense very quickly. You're not just lifting out a keyboard and dropping in a new one.
The teardown gets deep fast
A typical full replacement starts with the bottom case coming off, then the battery connector is isolated so the board is safe to work on. After that, the machine usually needs the logic board, daughter board, speakers, fans, trackpad hardware, and keyboard backlight removed before the keyboard can be lifted free. The sequence matters because the keyboard sits inside a layered assembly, not on top of a simple frame.
That's why a repair video for model-specific teardowns is worth watching before you start. The removal order shows how many parts sit between the back cover and the keyboard itself, and it makes clear why reverse-order reassembly is where DIY jobs often go wrong. A small missed connector can leave the keyboard, backlight, Wi-Fi, or trackpad dead even after a “successful” install (YouTube teardown reference).
If you'd rather hand the machine to a shop that does this kind of work routinely, walk-in MacBook keyboard service is a good example of the kind of in-person repair path people look for when they don't want to gamble on a complex disassembly.
Why the job feels bigger than the symptom
The failure mode isn't just the keyboard membrane. It's the cable routing, adhesive layers, screw map, and part alignment all at once. Once the adhesive-backed layers start to separate, the repair becomes a patience test, not a quick swap.
If the repair requires separating the top case, treat it like a rebuild, not a key replacement.
That distinction is the difference between buying a small part and committing to a full mechanical teardown. If you're short on tools or time, the machine's symptom may be simple, but the repair probably isn't.
DIY Replacement Prep and Common Pitfalls
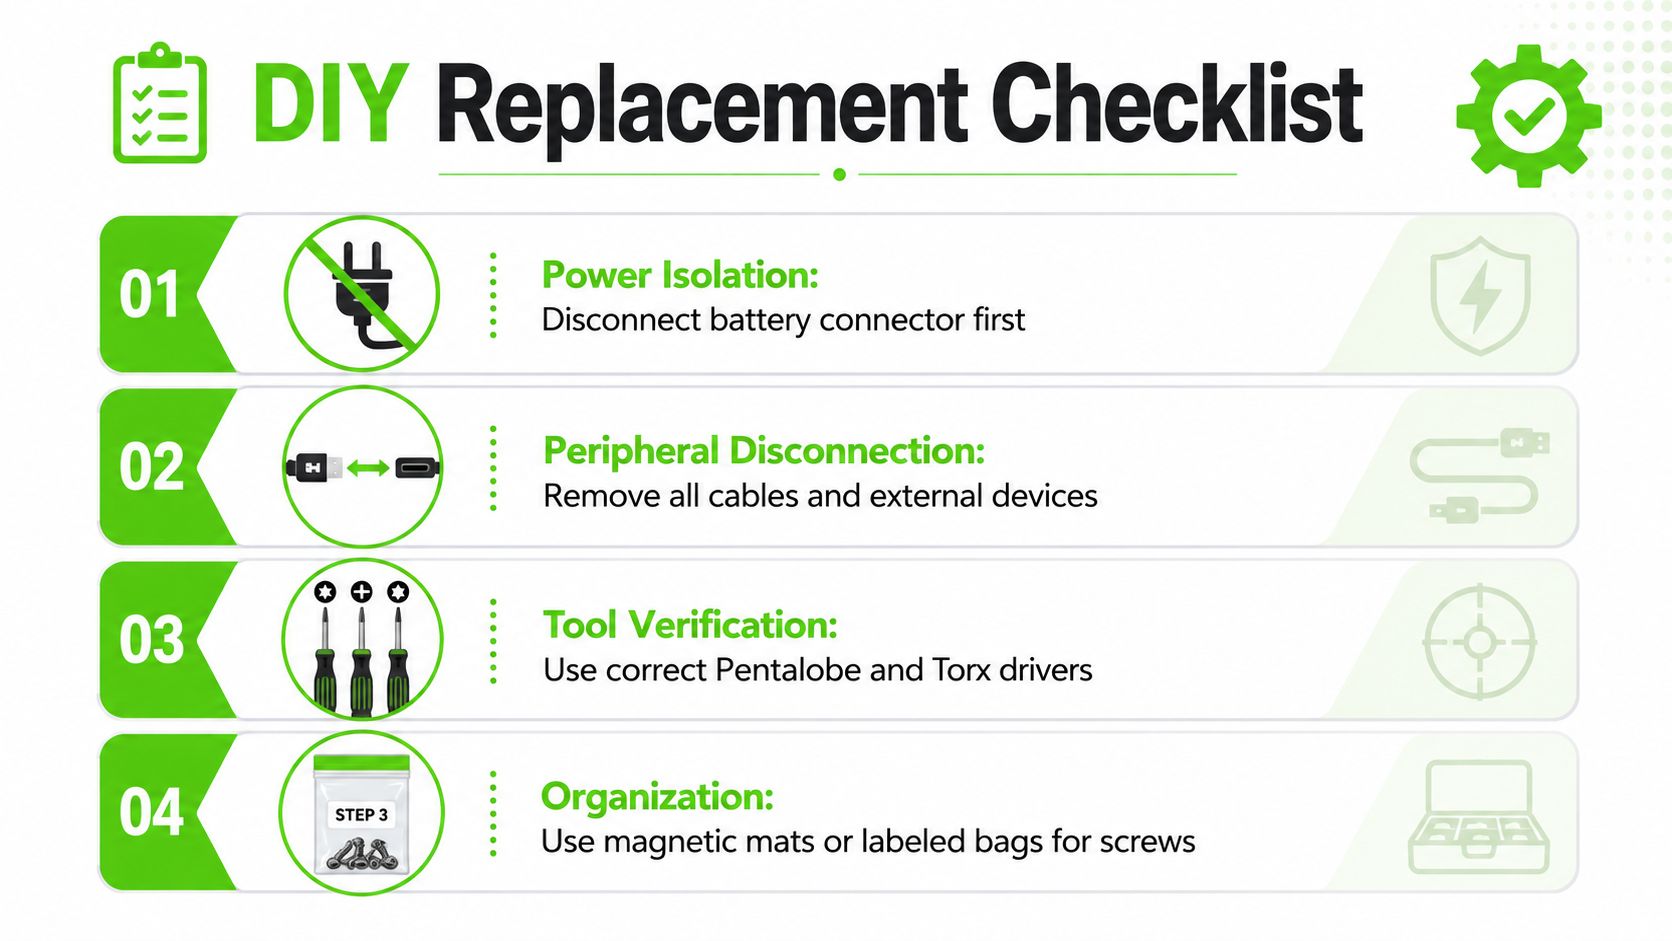
DIY replacement starts before the first screw comes out. If you skip the prep, the repair gets messy fast. The safe approach is to isolate power, clear the workspace, and make the screw layout impossible to mix up.
Set up the work the way a bench tech would
Shut the MacBook Pro down completely, unplug every accessory, and disconnect the battery before touching internal parts. Work on a soft, static-safe surface so the chassis doesn't get scratched while you're flipping it over and laying out components. Keep screws sorted by location, because MacBook Pro hardware often uses similar-looking fasteners that aren't always interchangeable.
Use a spudger or tweezers for battery and flex connectors instead of metal picks. That small choice protects the board, especially around fragile ribbon cables. Before you lift anything, verify that you can see where each connector terminates, because guessing is how logic board damage starts.
The mistakes that usually sink a first-time job
The most common failure is a torn flex cable during lift-out. Another is a misplaced screw, especially when two fasteners look almost identical but belong in different spots. The microphone flex cable can be damaged when it runs near the keyboard cable, so be careful at that junction. Old adhesive residue is another problem, because a new keyboard that doesn't seat cleanly can feel fine on the bench and fail later in daily use.
Clean removal is only half the job. Seating the new part correctly matters just as much.
For a security-minded checklist before sending any machine out or handing it over, the guide at how to protect personal data before repair is worth reading. It helps if you're deciding whether to DIY, ship, or book a local shop.
If you haven't done a top-case-level repair before, be honest about the patience it takes. The job punishes rushed hands more than it rewards enthusiasm.
Apple, DIY, or Independent Repair Compared
The best repair path depends on the machine, the symptom, and how much risk you're willing to accept. DIY gives you control, Apple gives you a formal service path, and an independent depot gives you a middle ground when you want the hardware fixed without learning the teardown the hard way. The right answer is usually the one that matches the actual scope, not the cheapest headline.
| Option | Typical Cost | Warranty Impact | Best For |
|---|---|---|---|
| DIY | Part cost plus tools | Self-inflicted mistakes aren't covered | Experienced users, older machines, and people comfortable with full disassembly |
| Apple authorized repair | About $400 for 2014 and 2015 models, and over $700 for newer butterfly-keyboard models, according to the reporting cited here (Digital Trends) | Best when you want the official repair path | Owners who want the manufacturer route and clear service records |
| Independent depot | Varies by model and damage scope | Depends on the shop and parts used | Owners who want a practical, inspected repair path without shipping the machine away |
Cost changes behavior
Standalone Apple-authorized repair pricing has been high enough to influence what owners do next. Reporting on liquid-damaged work also placed keyboard-related repair pricing roughly in the $600 to $1,300 range depending on size and condition, while AppleCare+ cases were cited around $125 (Digital Trends). Apple later said it would replace affected butterfly switch keyboards for free, which made a huge difference for eligible owners.
That kind of pricing gap is why some people stop trying to revive the old machine and plan the next service move. It's also why a repair quote should always clarify whether you're paying for a keyboard-only fix or a broader top-case service.
If you're comparing local shops, the guide on how to choose a reliable MacBook repair service near you in Houston is a practical place to start before you hand over the laptop.
How to think about the trade-offs
DIY makes sense when you've got the tools, time, and skill to handle the teardown cleanly. Apple makes sense when the machine is eligible for a formal service path or a replacement program. An independent repair shop makes sense when you want a diagnosis first and a clear quote before anything gets opened.
A low sticker price means nothing if the real job is a top-case rebuild.
One more service option worth mentioning is call Nerds 2 You Edmonton for help, especially if you're comparing what local providers do for MacBook keyboard faults and you want another repair-path reference point before deciding.
Why Your Model Determines the Real Repair Scope
Not every MacBook Pro keyboard problem is the same repair. On many modern machines, the keyboard is tied to the top case, which means the actual work extends beyond the key surface and into the battery, trackpad, cable routing, and backlight. On older models, a narrower repair may be possible, but the exact path still depends on the model family and what failed in the first place.
Model year changes the quote
The easiest way to avoid surprise is to identify the model number before talking to any shop. If you know the year and model family, a technician can tell you whether you're looking at a key repair, a keyboard module, or a top-case assembly. That one detail often explains why two MacBook Pro owners with similar symptoms get very different estimates.
A practical rule of thumb is simple. If the machine is a newer MacBook Pro and the keyboard problem is widespread, expect a top-case-level job rather than a tiny part swap. If it's an older machine and the problem is isolated, a narrower repair may still be on the table.
The undercovered reality most guides skip
Consumer guides often talk as if keyboard replacement means swapping the typing surface and moving on. Real repair work is less neat. The keyboard may be inseparable from the chassis workflow, and the battery and trackpad can be pulled into the service path even when they aren't the original complaint.
The quote should describe the assembly, not just the symptom.
That's the most important expectation to keep in mind. A keyboard issue can look small, but the repair scope can be large, and the model year is what tells you which side of that line you're on.
Choosing the Right Path for Your MacBook Pro
The decision comes down to three checks. First, what symptom do you have. Second, what model is the machine. Third, does the repair path make sense against your budget and urgency. If you answer those in order, you'll know whether you need a settings fix, a keyboard service, or a full top-case replacement.
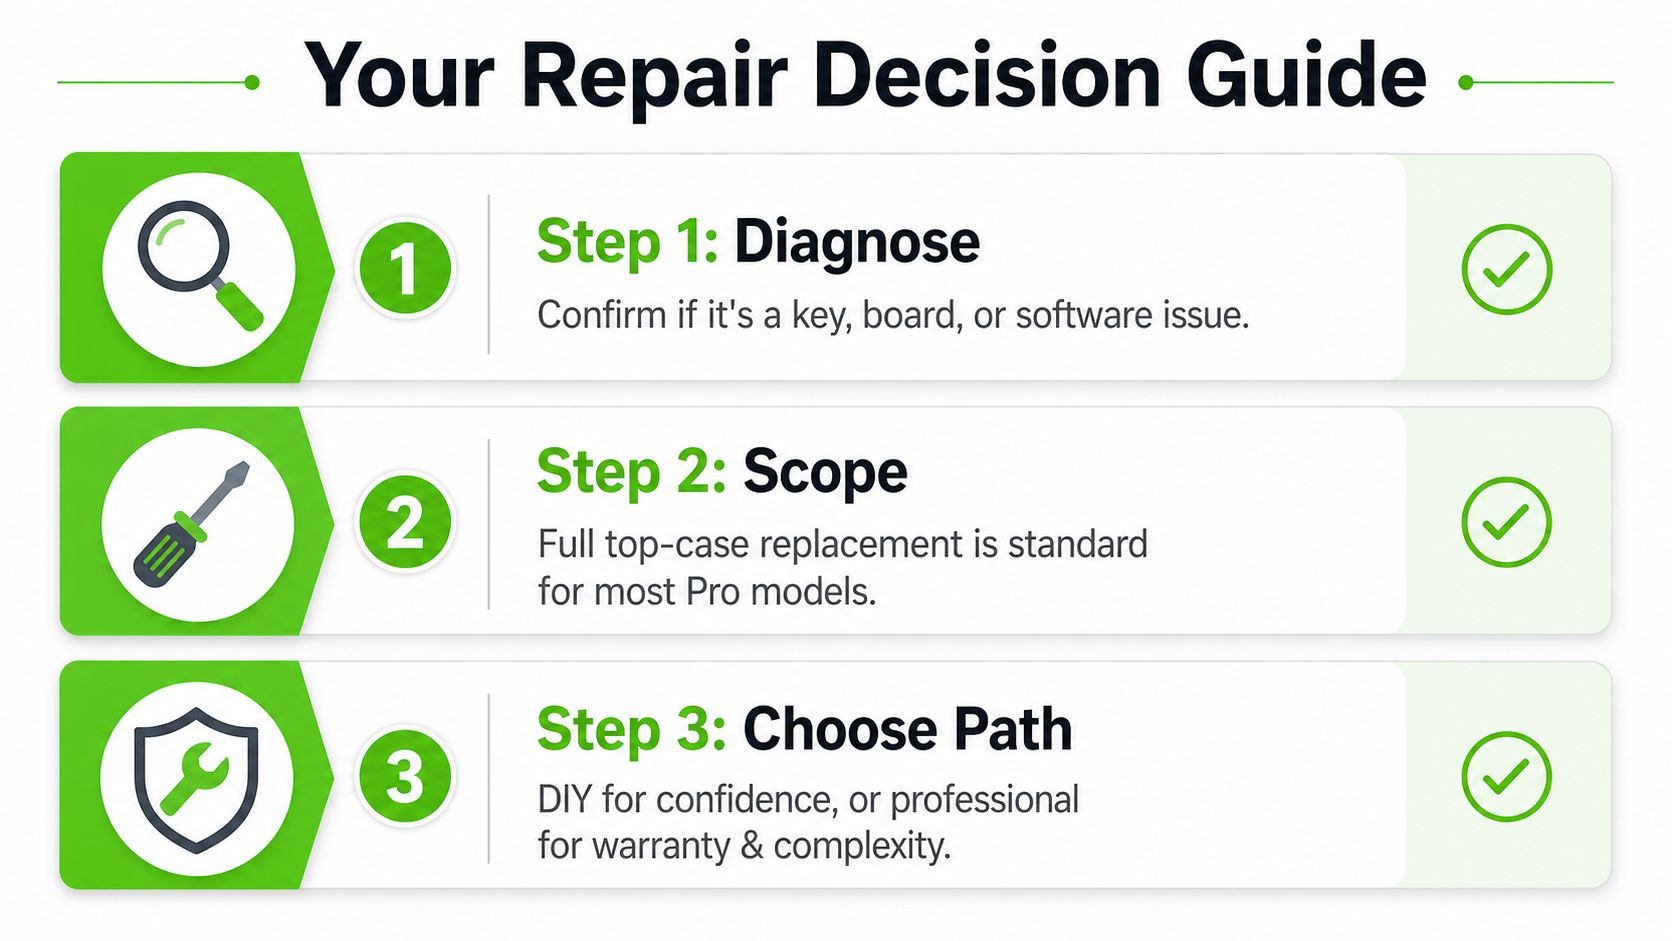
A quick decision framework
- Diagnose first. Confirm whether the problem follows one key, the entire board, or a software setting. That tells you if you're dealing with a small fix or a real hardware fault.
- Check scope second. On many MacBook Pro models, the repair is not a keyboard-only job. It becomes a top-case replacement, and that changes the labor.
- Choose the path last. DIY suits confident hands. Apple suits eligible machines and owners who want the official route. An independent shop suits people who want a clear diagnosis and a practical repair plan.
If your machine falls into Apple's butterfly era, check eligibility for the free replacement program before you pay for anything else. If it's outside that lane, ask for a written diagnostic quote that states whether the work is keyboard-only or top-case-level. That one sentence can save you from a bad surprise at pickup.
For Houston-area owners who want the machine inspected in-house, We Fix PC Laptop handles MacBook keyboard and top-case repairs from its depot service setup. If you're ready to stop guessing, visit We Fix PC Laptop and book a diagnostic so the repair path matches the underlying fault instead of the symptom.
- How to Find the Best Notebook Repair Shop: The 2026 Expert Guide
- The Ultimate Guide to Laptop Repair: Restoring Performance and Data in 2026
- Depot Repair vs. On-Site Repair: How to Best Repair Any Computer in 2026
- Comprehensive Laptop Screen Repair Guide: 2026 Professional Solutions
- How to Navigate PC Repair in 2026: A Step-by-Step Guide to Saving Your Computer
- Your MacBook Acting Up? Here’s What’s Probably Wrong and What You Can Do About It