.svg)
.svg)
.svg)




How to Recover Data from a Failed Hard Drive: Step-by-Step
You know the feeling. The folder won't open, the drive disappears, or it starts clicking like it's trying to die in real time. At that point, a common mistake is reaching for recovery software before you know whether you're dealing with a logical failure or a physically failing drive.
The distinction matters because the fix is completely different. A drive with corrupted folders, a bad partition table, or a damaged file system can often be imaged and scanned. A drive that's clicking, grinding, or failing to spin needs a different response, and every extra power-on can make the final recovery worse.
Table of Contents
- Understanding Hard Drive Failure Before You Panic
- Immediate Actions When a Drive Fails
- Recovering Data Yourself from Logical Failures
- Knowing When Professional Help Is Necessary
- Professional Recovery Costs and Realistic Outcomes
- Moving Forward After Data Recovery
Understanding Hard Drive Failure Before You Panic
A drive that looks dead can still hold your files. In many cases, the data is still on the platters, but the drive cannot read it back cleanly because something in the access path has failed. That is why how to recover data from a failed hard drive starts with diagnosis, not with recovery software.
Logical failure and physical failure are not the same problem
A logical failure usually means the hardware still works, but the file system, partition map, or directory structure is damaged. The drive may still spin, appear in the operating system, or report the correct capacity. The raw data can still be there even if the computer no longer understands how to read it.
A physical failure is a different case. Clicking, grinding, beeping, repeated disconnects, or a drive that will not spin point to hardware trouble, not just broken metadata. If you keep trying to “repair” a disk in that state, you can make the surface condition worse. Professional recovery guidance is blunt about that, and it also warns against running CHKDSK on a physically failing drive because the extra writes and reads can increase the damage (Rossmann Group DIY hard drive recovery guidance).
Practical rule: if the drive makes mechanical noise, stop treating it like a software problem.
A simple way to think about the first decision
If the drive still appears normally and sounds normal, cloning or imaging may still be on the table. If it is noisy, unstable, or disappears and reappears, the goal changes to preserving it exactly as it is. That is the step many guides skip, and it is where people waste time on the wrong tools.
The failure pattern itself matters. In a large drive analysis, analysts found that failed drives often had long service histories before they died, and they also showed growing numbers of bad sectors before the final failure. That does not mean you should wait for a drive to get worse. It means failing drives often give short, messy warning signs before they stop cooperating, and once those signs appear, the window for safe DIY work gets smaller.
If a drive is still readable, the next question is how to protect the data before anything else touches it. For a practical example of that step, see how to protect personal data before sending a PC for repair.
Immediate Actions When a Drive Fails
The worst move is to keep “testing” the drive. People reboot, click retry, launch repair tools, and keep browsing folders as if the disk will get clearer on the next pass. On a physically unstable drive, that turns a recoverable case into a worse one.
What to do first
- Power it down. Don't keep the machine cycling while you decide what to do.
- Disconnect the drive. If it's external, unplug power and data. If it's internal, leave the system off.
- Don't run repair utilities. Tools like CHKDSK are meant for logical corruption on healthy hardware, not a drive that's physically failing.
- Listen before trying again. Clicking or grinding means stop and plan for professional evaluation.
Professional recovery guides are blunt about this because the failure mode changes the entire workflow. A drive that clicks, beeps, or grinds is a cleanroom case. A drive that spins but isn't detected may be firmware or PCB related, which still usually needs lab-level tools rather than consumer software (MDRepairs dead hard drive recovery guide).
A clicking sound matters because it usually means the heads are not reading correctly and are retrying, which can scrape the platter surface if you keep powering the drive. A drive that doesn't spin may have a different fault, but the response is still the same, stop pushing it.
Stop line: if the drive is making new noises, dropping offline, or stalling the system, the safest move is to shut it down and not touch it again until you know what kind of failure you're dealing with.
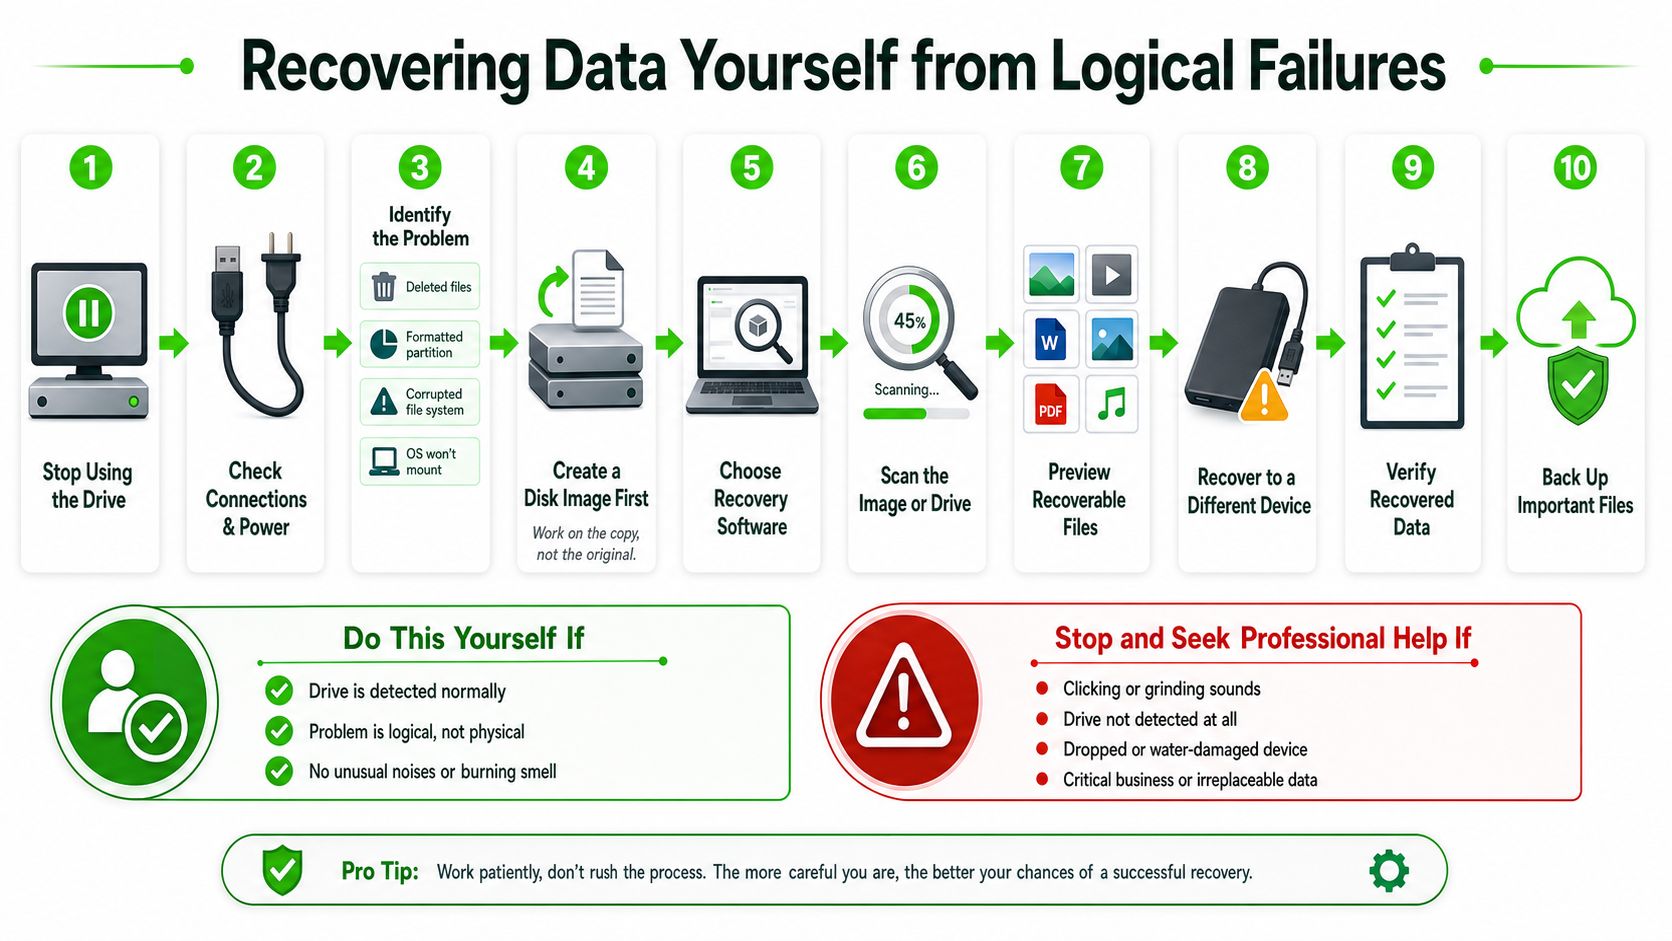
A recovery workflow only helps when the hardware is still readable enough to image. If the drive is unstable, every extra minute of power can lower the odds of a clean copy. That's why the first goal is preservation, not repair.
If you're already dealing with sensitive files and need to hand the device off later, this guide on protecting personal data before sending a PC for repair is worth reviewing once the drive is safely disconnected.
Recovering Data Yourself from Logical Failures
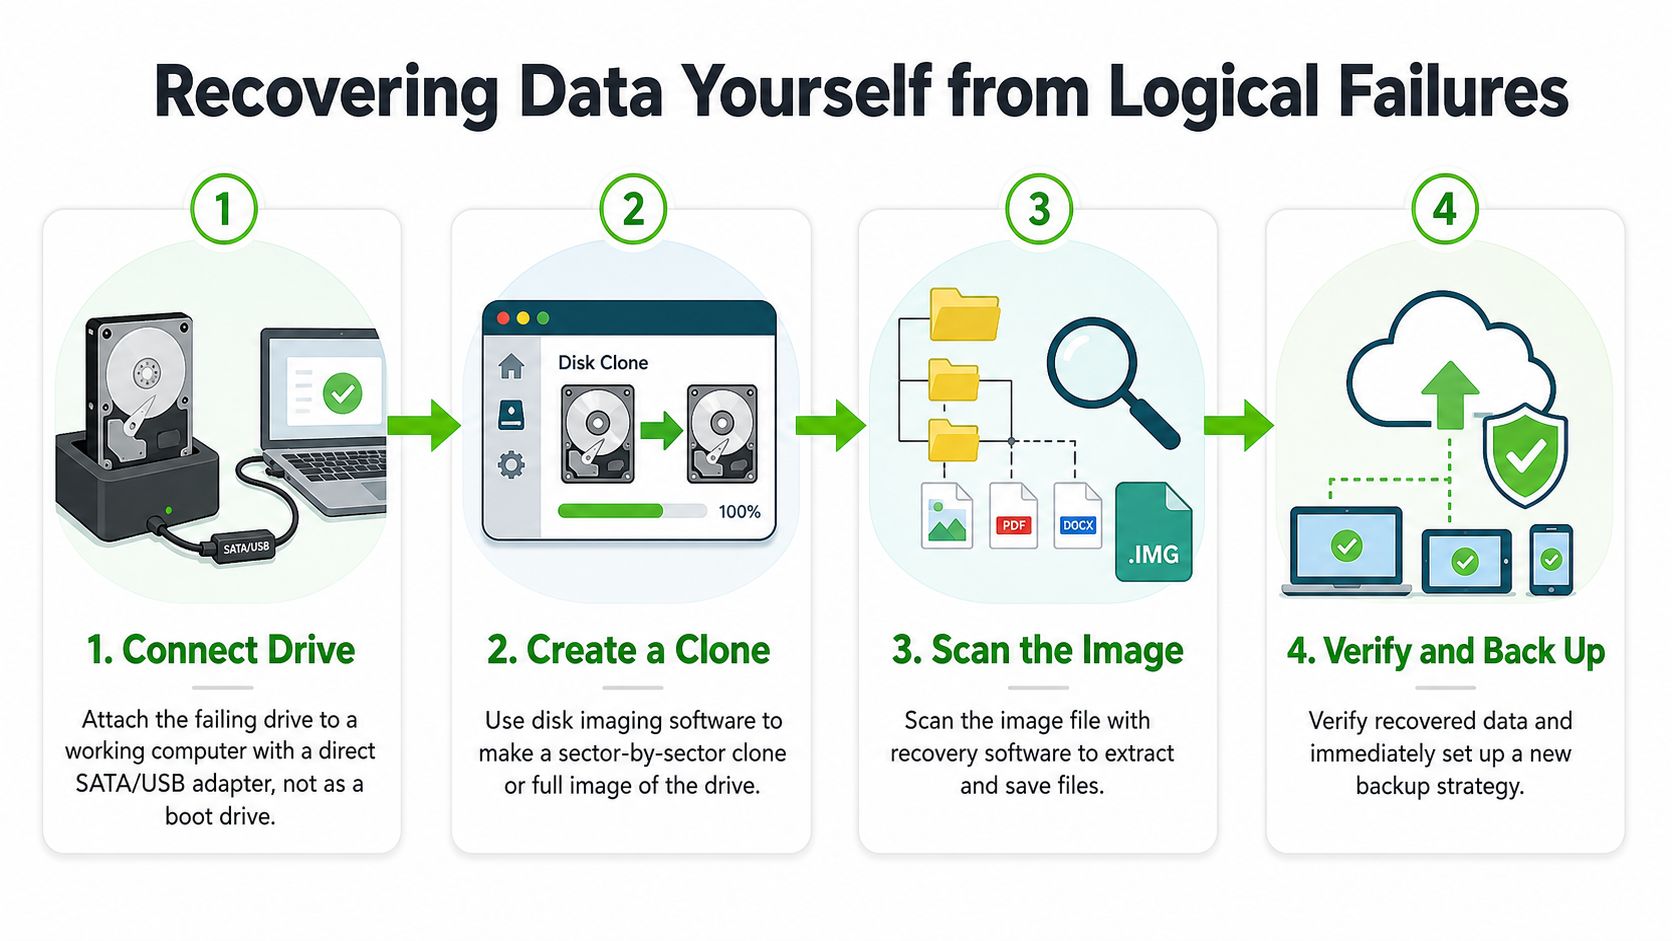
DIY recovery makes sense only when the drive still spins normally and is detected by the computer. Even then, the right move is not to browse the source disk and start copying folders around. The right move is to make a byte-to-byte image first, then work from that copy.
Clone first, recover second
Connect the drive through a SATA or USB adapter to a healthy computer, not as a boot drive. Identify the source and target disks with lsblk, then use ddrescue in at least two passes so the tool can copy readable sectors first and return to damaged areas later. That order matters because imaging preserves the evidence of the failure without adding avoidable wear.
This is the same logic professional workflows use. You want the original drive held still while the software works from a clone or image, because every read attempt on the original risks stressing weak sectors further. For logical failures, that gives you the best chance of a clean file-system rebuild later.
The actual recovery sequence
- Make the clone or image. Save it to a separate healthy drive with enough space for the full source.
- Scan the image, not the original. Recovery software can preview files, filter by type, and help you target only the folders you need.
- Save recovered files elsewhere. Use a different destination disk, never the failed source.
Recovery software is for reading, not repairing. If you start writing back to the failing drive, you can overwrite sectors you haven't recovered yet.
A common mistake is trying to “fix” the drive before imaging it. Another is saving recovered files back to the same disk because it feels convenient. Both choices reduce the final yield. The source needs to stay untouched until you've extracted whatever is still readable.
For larger drives, the practical burden climbs fast. The issue isn't just time, it's also spare storage, read instability, and the odds that a long cloning session will run into a second failure before it completes. That's why the modern question isn't just whether DIY is possible, it's whether it's still worth the risk for the capacity you're working with.
What not to do
Do not reformat the disk. Do not install recovery software onto the affected drive. Do not keep reopening folders to see if they work now. If the disk is intermittent, treat it as unstable, image what you can, and stop there.
The same recovery logic applies whether you're dealing with a home laptop, a desktop PC, or a small office machine. If you need a local shop that handles diagnostics, cloning, and data migration in an in-house facility, We Fix PC Laptop offers those services alongside component-level repair and backup setup.
Knowing When Professional Help Is Necessary
A hard drive usually gives you a warning before it fails completely. Clicking, grinding, beeping, repeated disconnects, or a drive that will not spin are physical warning signs, and they should push you toward a shutdown, not another round of software tools. An intermittently detected drive belongs in the same category, because every extra power cycle can turn a recoverable problem into a worse one.
The symptoms that cross the line
The clearest red flag is sound. A drive that clicks or grinds is not asking for a file-system repair utility, it is asking to be powered down and left alone. A drive that spins up and then disappears can point to firmware trouble, a PCB fault, or head damage, which is outside normal consumer recovery territory.
The failure-pattern analysis from Blocks and Files failure-pattern analysis explains why delay is a poor trade. In the sample they examined, about 50% of failures were tied to physical damage such as drops, while the rest came from mechanical or electronic issues. Head failures reached 99%+ success in professional cleanroom recovery, and bad-sector failures were 100% recoverable when handled promptly. Those are lab results, not do-it-yourself promises, but they show why a failing drive should be diagnosed before anyone starts running recovery software.
Why local lab support often wins
An in-house lab can move faster than a mail-in chain because the drive is not sitting in transit while the recovery window narrows. That matters when the device is already unstable. If the failure is mechanical, the lab can decide whether a cleanroom process is appropriate instead of letting the drive take more wear on a desk.
A professional diagnostic path is the right move when the drive makes unusual noises, will not stay online, or stops reporting reliably to the system. The quality of the service matters more than the sales pitch. A provider should be able to explain whether the failure is logical, firmware-related, or physical, because that distinction determines whether the job belongs in software, on the bench, or in a clean environment.
If you are comparing options and want a service overview focused on professional HDD recovery rather than consumer software, see this hard drive recovery service guide before you keep trying at home.
Professional Recovery Costs and Realistic Outcomes
Cost changes with failure type, not with how badly you want the files back. A logical issue is typically cheaper to handle than a mechanical one that needs cleanroom work, donor parts, or specialized imaging. The numbers below come from a recent cost analysis and are the clearest way to frame the decision (EaseUS data recovery cost statistics).
Professional Recovery Cost and Outcome Comparison
| Failure Type | Typical Cost Range | Success Rate | Turnaround Time |
|---|---|---|---|
| Logical corruption on an otherwise readable HDD | Lower end of professional recovery pricing | Often favorable when the drive is stable | Usually within the shorter end of standard recovery timelines |
| Standard HDD recovery case | $400 to $2,000+ | 70% to 90% for hard drives within recoverable limits | 3 to 7 days |
| Complex server or RAID recovery | Higher and more variable | Case-dependent | 1 week to 1 month |
| Broad cross-device professional recovery average | $2,000 to $4,000 | Varies by device and failure type | Varies by device and failure type |
The table hides an important truth. The quote isn't for “files,” it's for the engineering work needed to access them safely. If a drive needs cleanroom intervention, the lab isn't paying for a quick scan, it's paying for controlled hardware work and then imaging the recovered media.
What the price usually reflects
Logical cases tend to be simpler because the drive still behaves enough like a drive for imaging and software analysis. Physical cases cost more because the technician may need donor parts, head-stack replacement, or specialized firmware tools. The more the drive has drifted into mechanical failure, the more the process shifts from software to hardware reconstruction.
Modern capacity adds another layer. Large disks need more imaging time and more working space, which increases risk if the drive is unstable. The same goes for mixed Windows and macOS households, where people often discover they don't have a spare disk large enough to hold a full clone.
How to choose between providers
A good provider should tell you whether the case is worth opening, whether imaging is likely, and whether they can prove the data before you pay. That's the standard to look for. If the diagnosis is vague, the price quote probably will be too.
If you want a structured comparison before choosing a lab, review this data recovery company comparison guide. It's a better filter than chasing the cheapest ad.
Moving Forward After Data Recovery
Once the files are back, verify them before you trust them. Open a sample of documents, check photo libraries, and confirm that the folders you care about contain usable data. Recovery isn't finished when the copy completes, it's finished when the files open.
If the failed disk was part of a RAID set, the situation changes because the array structure matters as much as the drives themselves. SSDs also don't follow the exact same failure profile as HDDs, so don't assume the same symptoms mean the same repair path. Early warning signs like SMART errors or intermittent recognition deserve fast attention because the longer you wait, the fewer clean options you'll have.
Prevention is the only guaranteed protection. Keep at least one separate backup that isn't sitting on the same physical disk, and treat a drive that starts acting strangely as a problem to isolate, not a device to “keep using until it dies.”
If you're in Houston and need hands-on help with a failed hard drive, We Fix PC Laptop can diagnose the drive in-house, perform data recovery when it's still viable, and clone or migrate the data to a safer destination. Visit We Fix PC Laptop to get help from certified technicians who work on failed drives, data loss cases, and the backup setup you'll want in place after the recovery.
- Professional Hard Drive Recovery Service: Secure Data Restoration for 2026
- The Ultimate Guide to Laptop Repair: Restoring Performance and Data in 2026
- Comprehensive IT Services and Support for Healthcare: The 2026 Practice Readiness Guide
- Data Recovery for Law Firms: A Step-by-Step Guide to Saving Critical Evidence
- How to Choose Between Data Recovery Companies: A Complete 2026 Comparison Guide
- Ransomware Recovery Plan: A Comprehensive Guide for Business Continuity