.svg)
.svg)
.svg)




Buttons Not Working? Quick Fixes and When to Book Service
You press a key and nothing happens. No click, no beep, no response. That dead moment can make a simple task turn into a full-on interruption, especially when the same symptom could mean dust under a keycap, a worn tactile switch, a disabled touch driver, or a software conflict that's blocking input at a deeper layer.
The fastest way to stop wasting time is to split buttons not working into three buckets, physical hardware, driver or firmware, and software. A repair bench diagnosis starts there because the right fix depends on where the failure lives, not how annoying it feels.
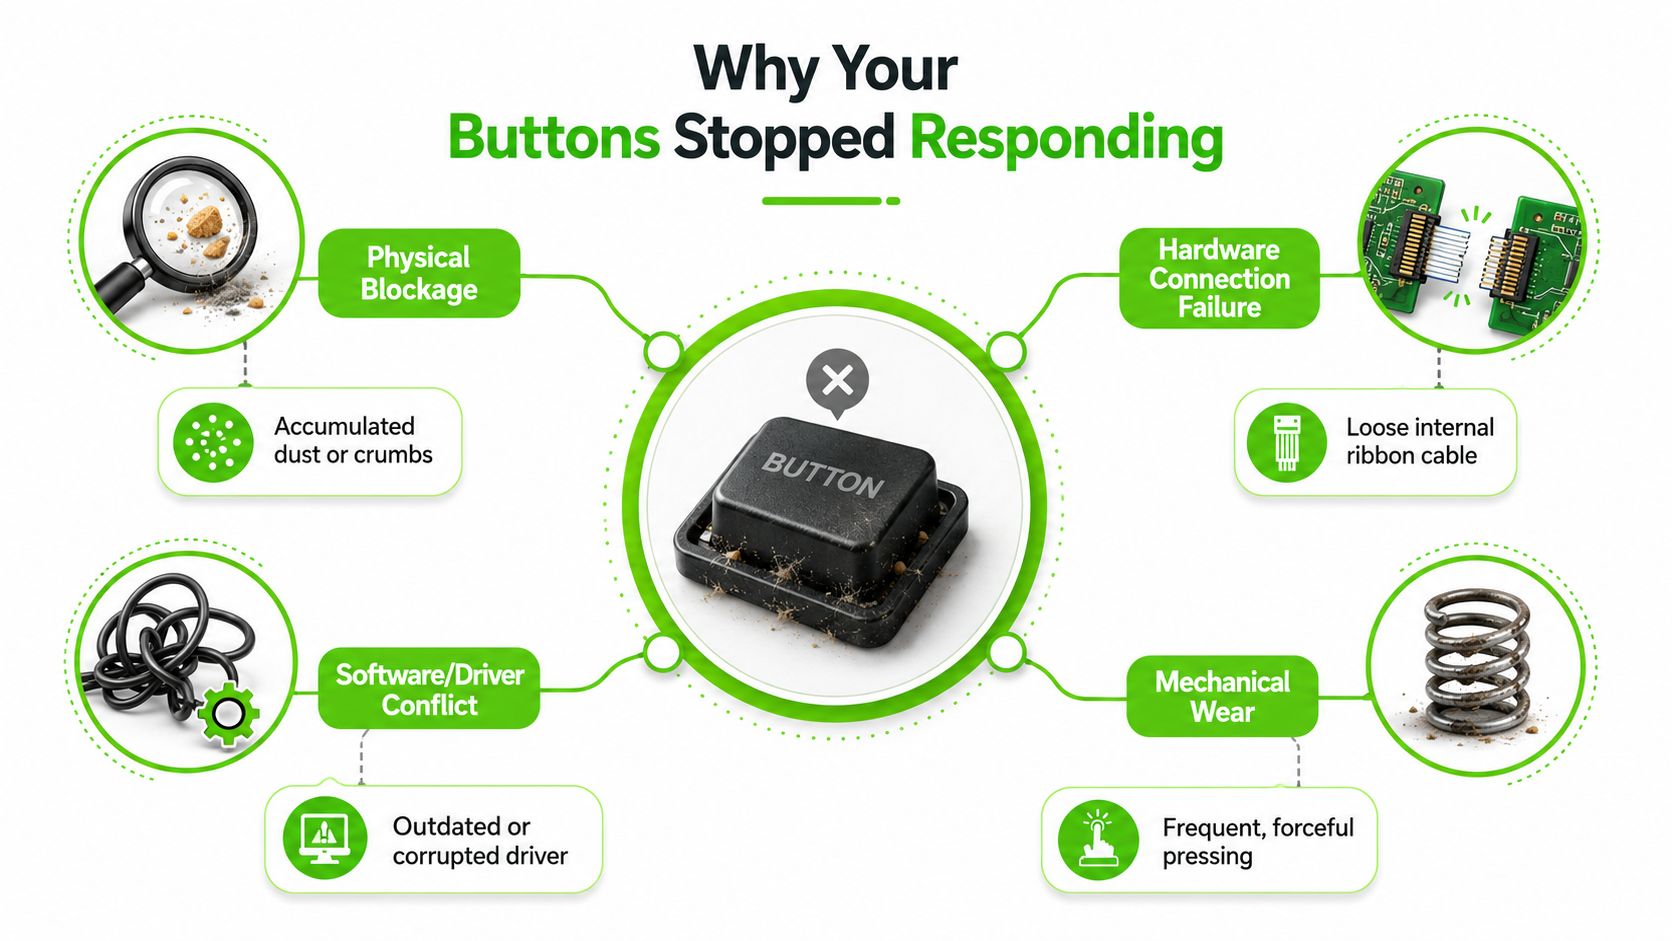
Table of Contents
- Why Your Buttons Stopped Responding
- Identifying Physical Hardware Failures
- Cleaning and Reseating Without Causing Damage
- Fixing Driver and Firmware Problems
- When to Stop DIY and Book a Professional Repair
- Keeping Your Buttons Working Longer
Why Your Buttons Stopped Responding
A button that won't respond doesn't automatically mean the device is broken beyond repair. It may be something simple, like debris under a key or a control that's been disabled in settings. It can also be a real component failure, and the symptom looks the same from the outside.
Start by separating the symptom from the layer
If the button feels physically different, mushy, sunken, or stuck at an angle, that points toward hardware. If the button feels normal but nothing happens until you reboot, update, or change settings, the problem is more likely software or firmware. If a touchscreen button or hotkey works in one environment but not another, the fault may sit in the driver stack.
That layered approach isn't new. Push buttons have been treated as a measurable reliability category in electronics for years, with guidance that lists push buttons with a base failure rate of 0.02% per 1,000 hours and a total failure rate of 0.05% per 1,000 hours, and defines 1 FIT as one failure per billion operating hours (Analog Devices reliability guidance). In plain terms, button wear is an engineering problem, not a mystery.
Historical context helps too. Electric pushbuttons spread through doorbells, intercoms, elevators, and other controls in the late 19th century, and a historical survey notes that hundreds of patents were filed between 1880 and 1920 for electric or push-button mechanisms (historical survey). That long reuse explains why the same failure shows up across keyboards, appliances, and touch devices.
Practical rule: if the button feels wrong, think hardware first. If it feels normal but the device ignores it, look at software or drivers next.
A quick way to narrow it down
Use your senses before you use tools. A key that gives uneven travel, a button that only works when you press one side, or a failure that started after a spill usually belongs in the physical bucket. A button that died after an update, a reset, or a new gesture setting belongs higher up the stack.
For readers searching for power button repair Singapore, the same logic applies even though the device differs. The label on the part changes, but the diagnostic question stays the same, is the control blocked, worn, disabled, or electronically misread?
Identifying Physical Hardware Failures
A real hardware failure usually leaves fingerprints. The button feels off, the response is inconsistent, or the problem started right after a drop, spill, or heavy use. When a switch is failing mechanically, the issue rarely fixes itself with a restart.
What a failing switch usually feels like
A healthy tactile switch has a consistent feel and predictable response. A failing one may go mushy, require extra force, or work only when pressed at a specific angle. If only one key is affected while neighboring keys behave normally, that's another clue that the problem is local to the switch, not the whole system.
Repair guidance separates these cases into contamination, wear, and mechanical damage. If the switch feels normal but tests intermittently, cleaning may help. If the dome or tactile leaf is deformed or damaged, replacement is usually the right path. One independent repair-source summary reports about 65% of button issues are physical and 35% software-related, which is why software fixes alone miss a lot of real-world failures (Omron repair guidance).
A proper electrical check is straightforward. Isolate power, put the switch in continuity mode on a multimeter, and compare unpressed with pressed behavior. A healthy switch should read open line or OL when unpressed and drop to near 0 Ω when pressed. If the unpressed reading is below about 1 MΩ, contamination, moisture ingress, or flux bridging is likely. For a deeper look, an oscilloscope can capture contact bounce before the signal settles (Vista Electronics tactile switch troubleshooting).
When the symptoms point to a replacement part
Once the feel is wrong and the electrical test confirms it, you're usually past cleaning. The switch itself, the key dome, or the keypad membrane may be worn out. That's especially true after liquid exposure, impact, or years of repeated pressing.
Before you tear into the device, compare what changed. One dead key after a spill is a hardware clue. A whole row of controls failing after a system update is not. That distinction saves a lot of time and keeps people from blaming the wrong part.
Cleaning and Reseating Without Causing Damage
Cleaning works best when the problem is contamination, not wear. The mistake is attacking the key from the outside with too much force, which pushes debris deeper or breaks the mechanism that was still salvageable.
Use the right tool for the kind of dirt you're dealing with
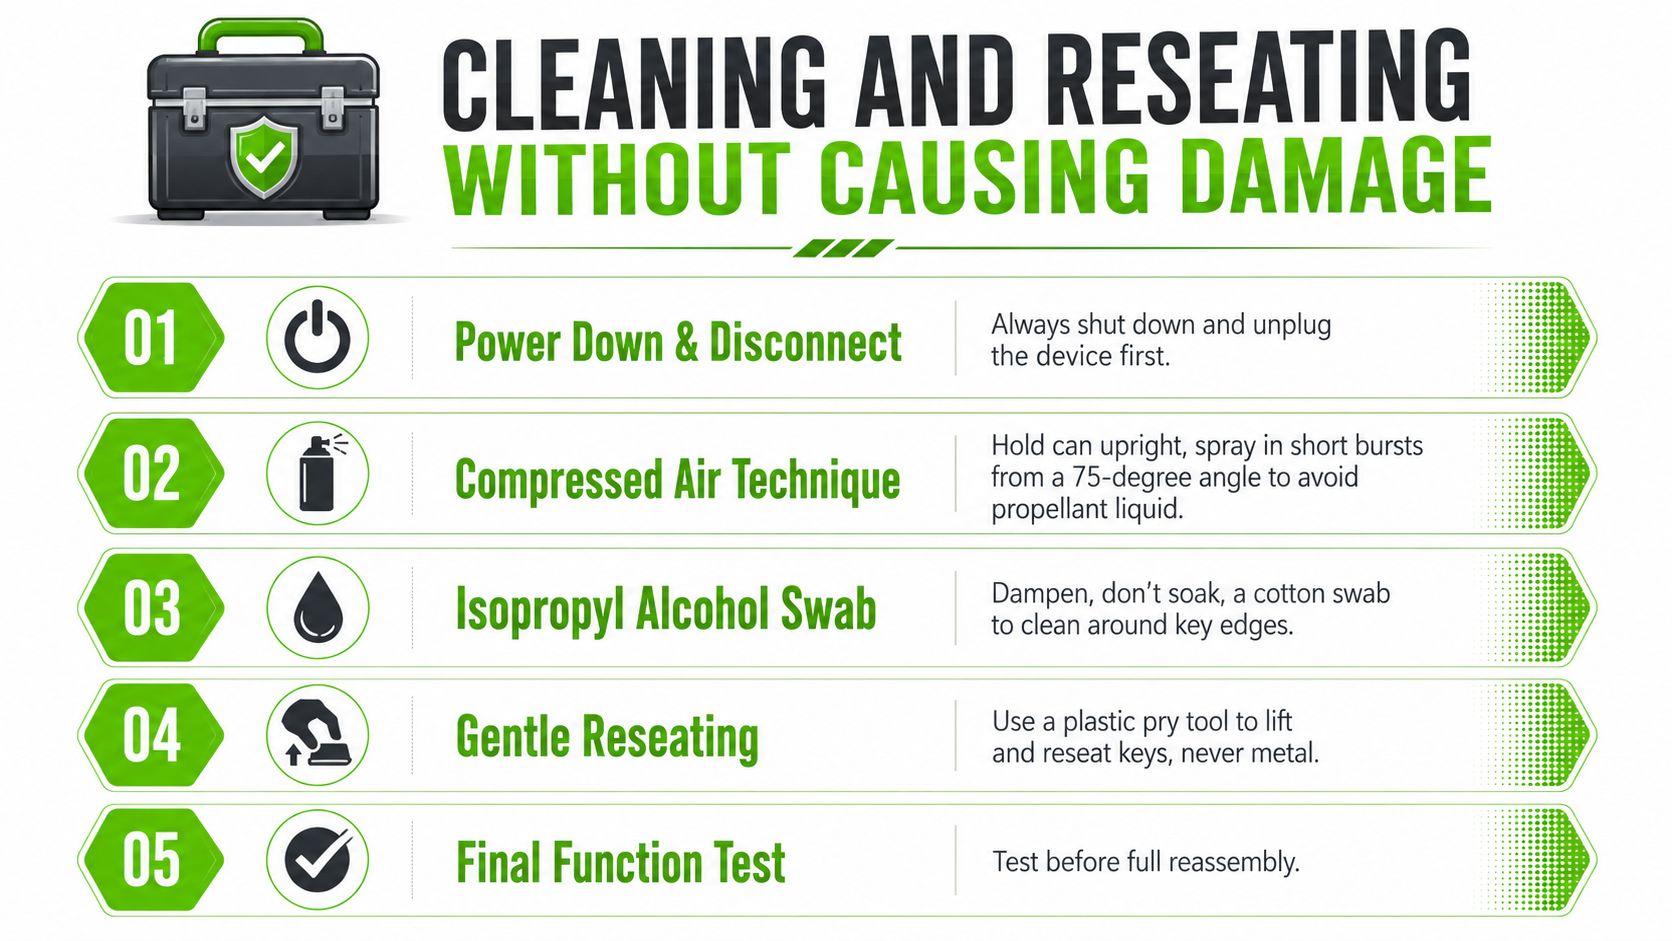
Start with power off and the device unplugged. Short bursts of compressed air can clear loose dust and crumbs, but don't blast straight down into the key cluster. Hold the can upright and work from an angle so you're moving debris out, not compressing it into the switch cavity.
If a key is sticky rather than dead, a lightly dampened cotton swab with isopropyl alcohol can clean around the edges. Don't soak the swab. Too much liquid can migrate under the key and create a bigger problem than the grime you were trying to remove.
If the key is mechanically bent, cracked, or tilted, stop cleaning and inspect the fit before you keep pressing it.
Laptop keyboards deserve extra caution because the scissor mechanism underneath can snap if you pry with metal tools or apply too much force. Desktop keyboards and external peripherals are a little more forgiving, but the same rule still holds, gentle first, force last. If you need to lift a keycap, use a plastic pry tool and reseat it carefully instead of twisting it sideways.
Know when cleaning is the wrong fix
Cleaning can rescue contamination, moisture residue, or a key that's sticky. It won't fix a deformed dome, a broken scissor clip, or a switch that no longer closes electrically. If you clean, reseat, and test, but the button still misses presses or feels mechanically uneven, stop there.
For readers who want a deeper walk-through on one common symptom, the guide on sticky laptop keys is a useful companion reference. The key point is simple, cleaning is a recovery step, not a license to keep forcing the part.
Fixing Driver and Firmware Problems
When a button feels normal but the device ignores it, the fault often lives between the hardware and the operating system. That's where driver, firmware, and setting issues show up, especially on Windows laptops and touchscreen devices.
Check the device layer before you chase app settings
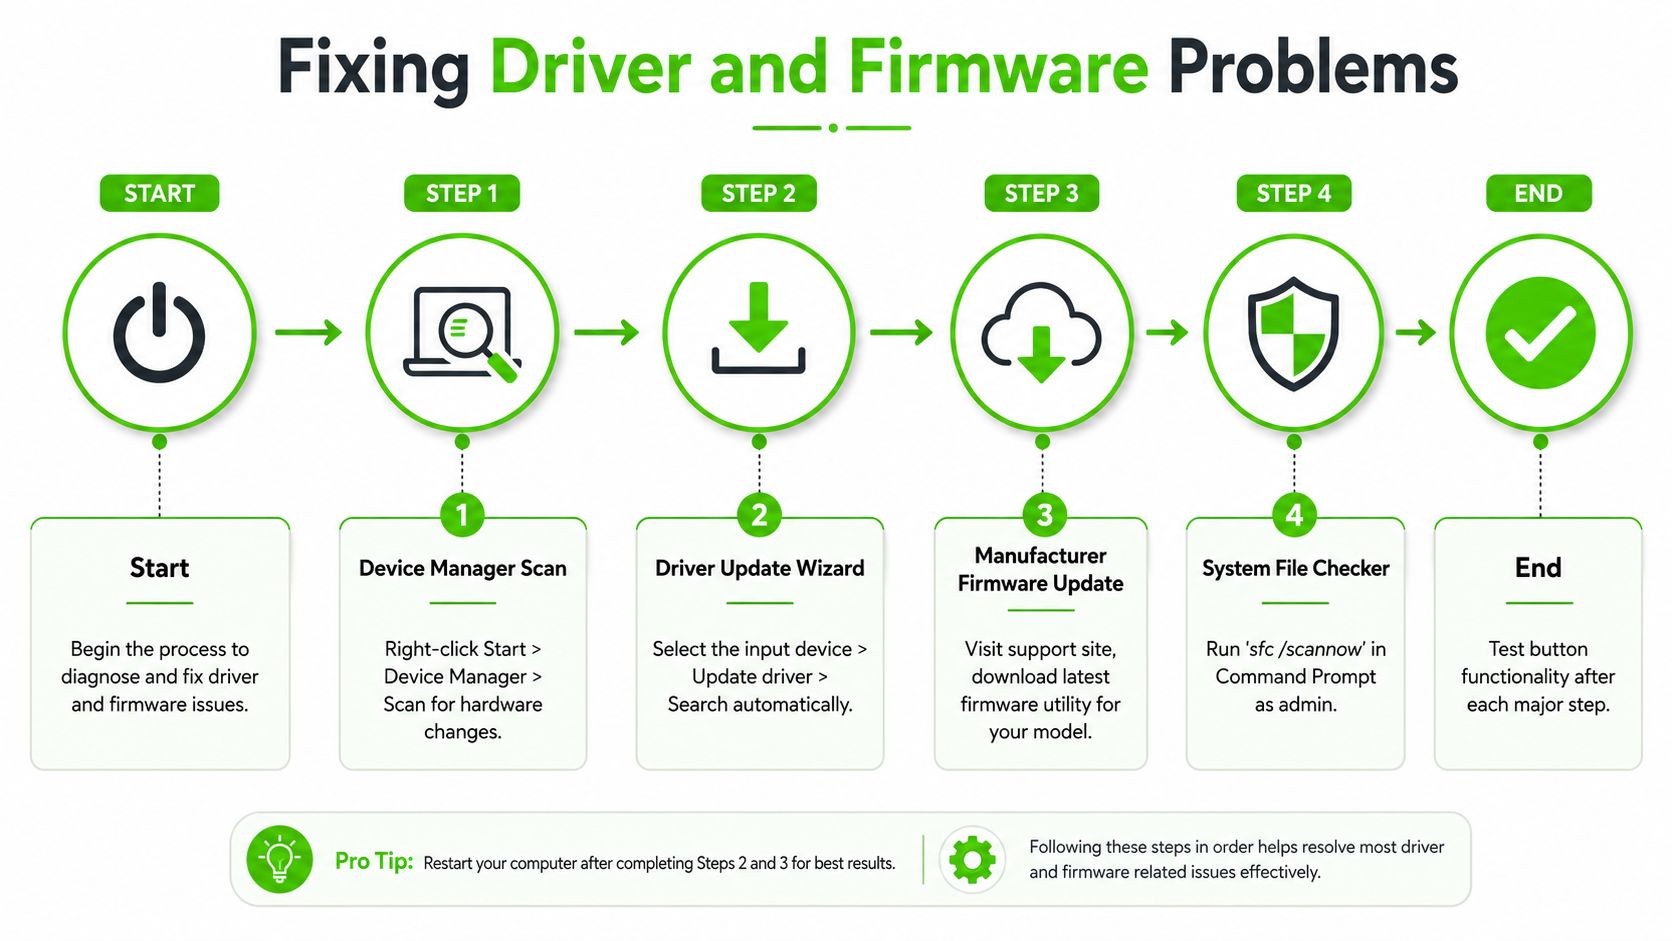
On Windows, open Device Manager, look for the input device, and check whether it's disabled, missing, or showing a warning state. If it looks off, try Scan for hardware changes first, then update the driver. If the system recently changed and the button started failing afterward, that timing matters.
Some touch and HID issues clear when Windows removes a bad driver and reinstalls a fresh copy. That's why simple reboots sometimes appear to help, they're only masking a broken software layer. If the button is tied to a touchscreen, keyboard, or special input device, also check whether the HID-compliant touch screen or related input entry is disabled.
Microsoft and Samsung both route users through restart steps, Windows updates, driver checks, and firmware testing to separate software faults from hardware ones. The practical rule is this, if touch works in UEFI or Safe Mode but not in the normal OS, the issue is likely software or driver-related. If it fails there too, hardware service becomes the stronger suspect (Samsung support troubleshooting).
Use firmware tests to isolate the layer
Firmware testing matters because it bypasses part of the operating system. If the control works before Windows fully loads, you've narrowed the fault quickly. If it doesn't work in firmware either, don't keep reinstalling the same driver and hoping for a different result.
For a related scenario where software changes create input problems after an update, the article on computer running slow after Windows update is a useful reminder that update-related symptoms often need targeted rollback or driver review, not a blind reset. That same principle applies to dead buttons.
Don't ignore gesture and accessibility conflicts
Convertible laptops and tablets can fail in subtler ways. A touch target may still exist, but a gesture setting, accessibility option, or disabled touch driver makes it seem dead. If the button is on a touchscreen, check whether the UI element is present and whether keyboard navigation can reach it.
That matters because some “button not working” complaints aren't hardware at all. They're interface problems. The control may be visible to one user and effectively unusable to another, especially when the input method changes.
When to Stop DIY and Book a Professional Repair
Some failures are worth chasing at home. Others are the point where more probing causes more damage. The smartest move is to stop when the device starts telling you the repair has moved beyond surface-level work.
Clear signs you're past the safe DIY stage
Liquid damage that reached the motherboard is one. Multiple keys failing at the same time is another, because that usually points to a broader circuit or assembly issue rather than a single dirty button. A power button that won't let the device turn on at all is especially important, since the machine may not be safe or practical to keep powering up.
Warranty status matters too. If the device is still covered, opening it yourself can complicate the repair path. That's not a scare tactic, it's just how service channels work.
When repair shops do the job properly, they don't guess. They perform component-level diagnosis, test the switch or board path, and replace the individual switch or the full keyboard assembly depending on what failed. For MacBook-specific keyboard replacement examples, the service notes on replace keyboard on MacBook Pro show why full assembly work is often the cleaner route when the failure isn't isolated.
Good repair shops fix the layer that failed, not the symptom you can see from the outside.
Compare repair value against device age
Older laptops with chronic button issues need a straight cost-benefit conversation. If the machine has repeated failures, a worn keyboard deck, or liquid history, the repair may be more about restoring stability than making it “like new.” If the rest of the machine is solid, a targeted repair can still make sense.
If the button issue keeps spreading, though, replacement becomes the rational choice. That's especially true when the keyboard, control board, and surrounding parts all show wear at the same time.
Keeping Your Buttons Working Longer
The cheapest repair is the one you never need. Most button failures start with habits, not bad luck, and a few small changes can slow the wear down.
Build habits that don't punish the switch
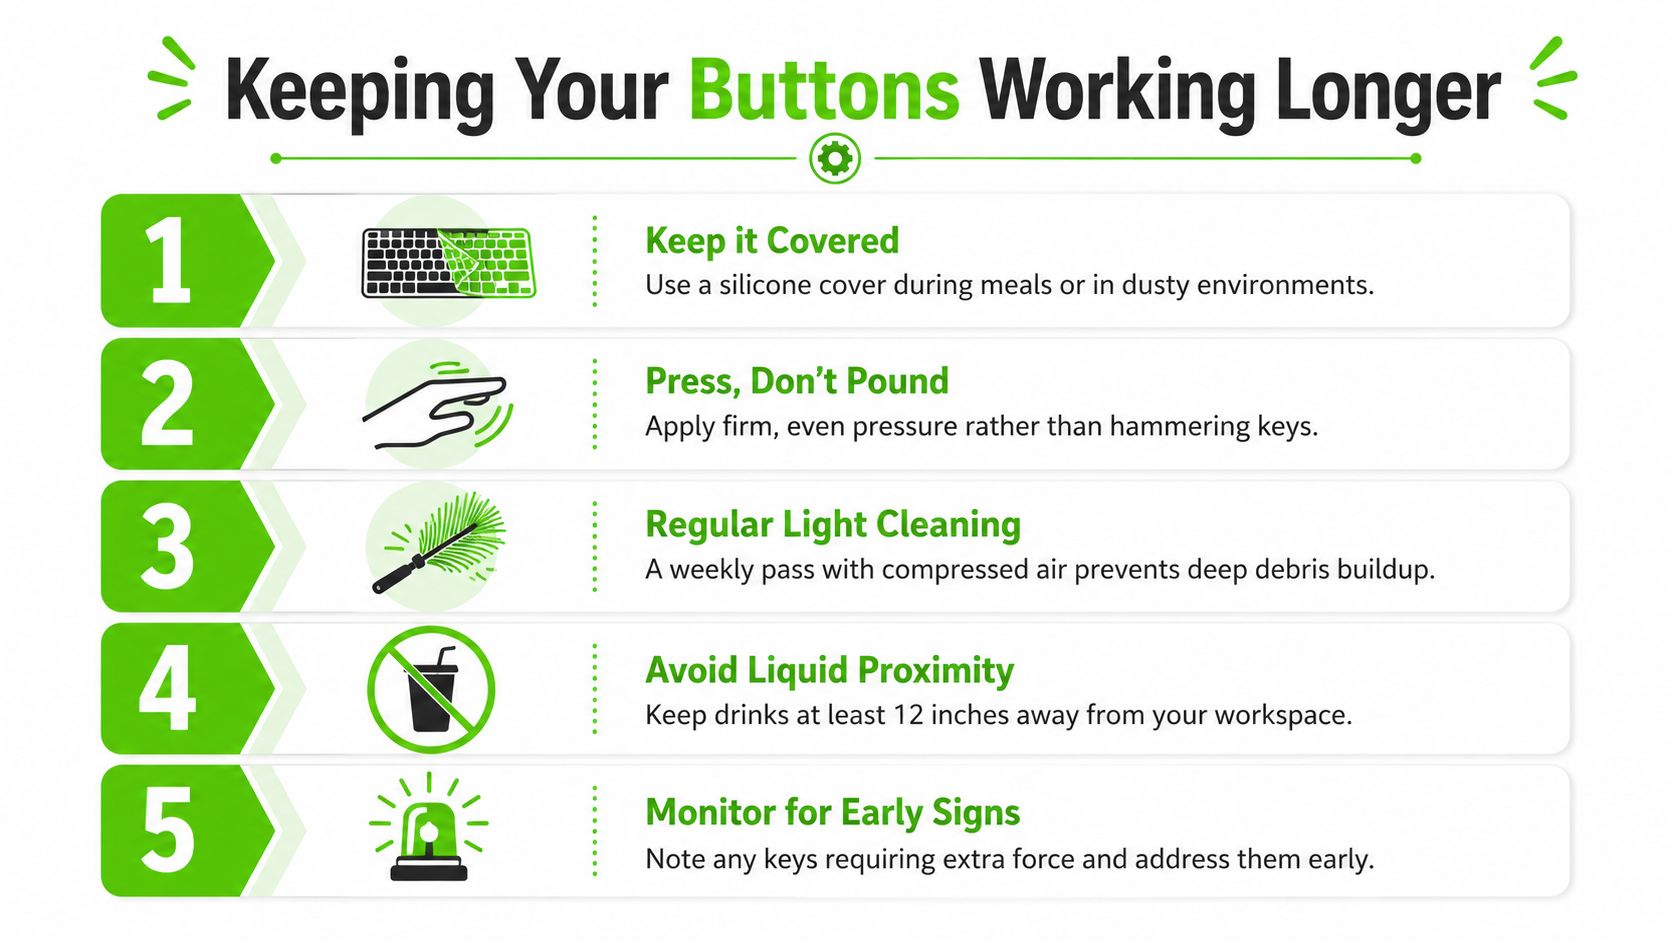
Keep food and drinks away from the workspace. Press keys with firm, even contact, not a hammering motion. If you type with nails instead of fingertips, you're wearing the contact point harder than you need to.
A light cleaning routine helps too. A quick pass with compressed air keeps grime from settling deep enough to interfere with travel or contact. In dusty or spill-prone environments, a keyboard cover can buy you time and reduce exposure.
The best early warning sign is a key that suddenly needs more force than the others. That's the point to act, not the point to wait and see if the problem spreads. One bad button often stays one bad button only if you catch it early.
Keep the diagnosis framework simple
When a button stops responding, think in this order, physical blockage, hardware wear, driver or firmware issue, then software conflict. That sequence keeps you from treating every failure like a reboot problem.
If the control feels wrong, test the hardware. If the control feels normal, test the driver layer. If the device only fails in one app or one mode, look at software and settings. That's the same framework technicians use at the bench because it saves time and avoids unnecessary parts swapping.
If you've tried the safe checks and the button still won't come back, reach out to We Fix PC Laptop in Houston for professional diagnostics and repair. They handle laptop, desktop, and Mac hardware from an in-house depot, and you can visit We Fix PC Laptop to get the problem assessed before a small button issue turns into a bigger board-level repair.
- Sticky Laptop Keys: How to Clean and Fix Them Safely
- Houston Small Business Computer Repair: 2026 Guide
- CPU Repair Guide 2026: Can a Damaged Processor Actually Be Fixed?
- Depot Repair vs. On-Site Repair: How to Best Repair Any Computer in 2026
- Professional In-House Depot Computer Repair: The Gold Standard for Hardware Restoration
- Signs Your CPU May Be Failing and When to Seek Repair
- Why Your Computer Keeps Freezing: Explore Technical Causes and Professional Repair Solutions