.svg)
.svg)
.svg)




MacBook Air 13 Inch Screen Replacement: Your 2026 Guide
You're standing at the counter with a cracked MacBook Air 13-inch screen, the machine still powers on, your files might be fine, and the first question from any decent technician is the only one that matters: what exact Air model is this? Get that wrong and you can buy the wrong display, lose camera features, or spend more than the laptop is worth. Get it right and the repair becomes a straightforward decision, not a guessing game.
The hard truth is that macbook air 13 inch screen replacement isn't a single job anymore. Older Intel Airs, the M1 A2337, the M2 A2681, and the M3/M4 A3113 all look close enough to confuse buyers, but the screen assemblies are not the same thing. On modern models, you're usually replacing a full display assembly, not just a bare panel, and that difference is why so many online parts listings are misleading.
Table of Contents
- When the Air's Screen Goes Dark or Shattered
- Identifying Your 13 Inch MacBook Air Model
- What a 13 Inch MacBook Air Screen Replacement Actually Costs
- Comparing the Major 13 Inch Air Generations
- Hidden Damage Behind a Cracked 13 Inch Air Screen
- DIY Versus Professional Repair for the 13 Inch Air
- Warranty, AppleCare+, and Third-Party Coverage
- Your Pre-Repair Checklist Before Handing Over the Air
When the Air's Screen Goes Dark or Shattered
A customer walks in with a cracked 13-inch MacBook Air, sets it on the counter, and says the same thing I hear every week. “It still has my work files on it. I just need to know if it's worth fixing.” That's the moment. The glass is broken, the screen may be flickering or black, and the owner is thinking about cost, data, and whether the machine is even worth opening.
The first move is simple. Identify the model before anyone orders a part. If the machine is an older Intel Air, pricing and parts availability look very different than they do on an M-series machine, and that gap changes the whole repair decision. A wrong order wastes time and can strand the laptop for days.
Practical rule: treat the screen repair as a model-matching problem first, and a parts swap second.
That's why this guide focuses on the choices generic repair pages skip. You need the exact model family, you need to know why modern Air screens are integrated assemblies, and you need a realistic view of repair cost versus replacement value. If you're in Houston and your screen just failed after a drop or pressure hit, the emergency playbook is similar to the one outlined in this laptop screen repair guide for Houston users, protect the data, stop pressing on the lid, and confirm the model before committing to service.
The rest comes down to three decisions. What Air do you have? What exact assembly fits it? Is the repair cheaper than replacing the machine? If you answer those three cleanly, you won't get talked into the wrong part or the wrong repair channel.
Identifying Your 13 Inch MacBook Air Model
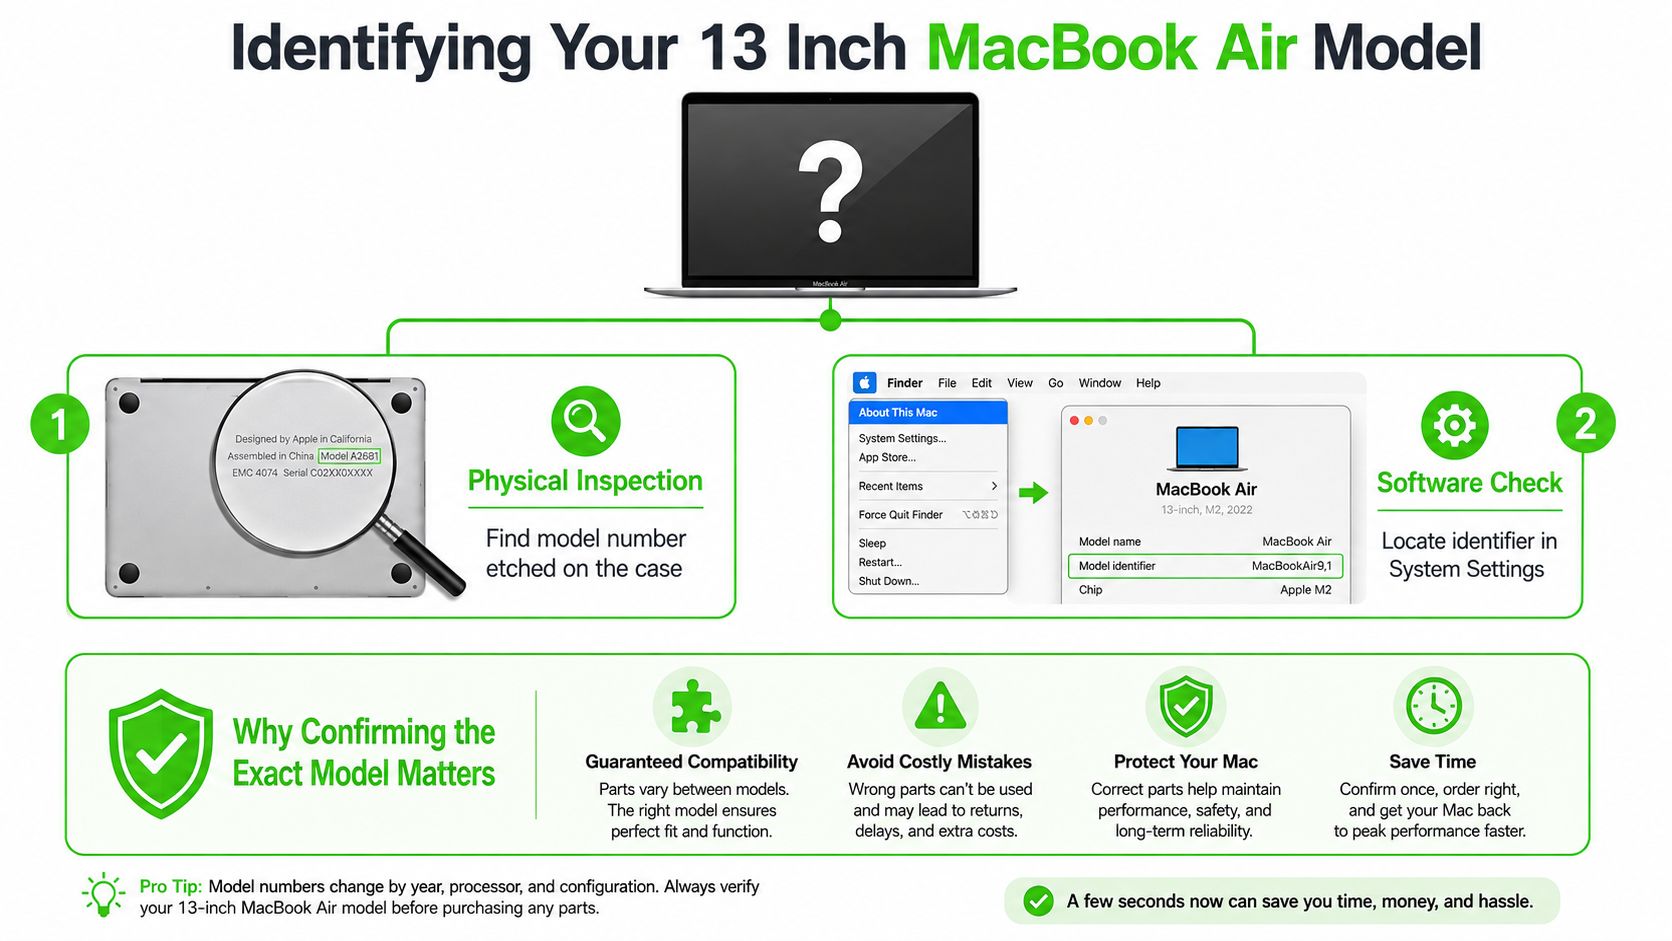
The model number decides the repair. Apple has shipped several 13-inch Air designs that look close from across the counter, but the display assemblies, cutouts, and connector layouts are not the same. Order a screen by saying “13-inch MacBook Air” and you invite the wrong part, the wrong cable behavior, and a return that costs time.
Check the model number the right way
Start with the underside of the machine. Apple prints a model identifier there, and that is the number sellers and repair shops use. If the Mac still boots, you can also check About This Mac or the system settings screen. That route is cleaner, because it pulls the model from the machine itself.
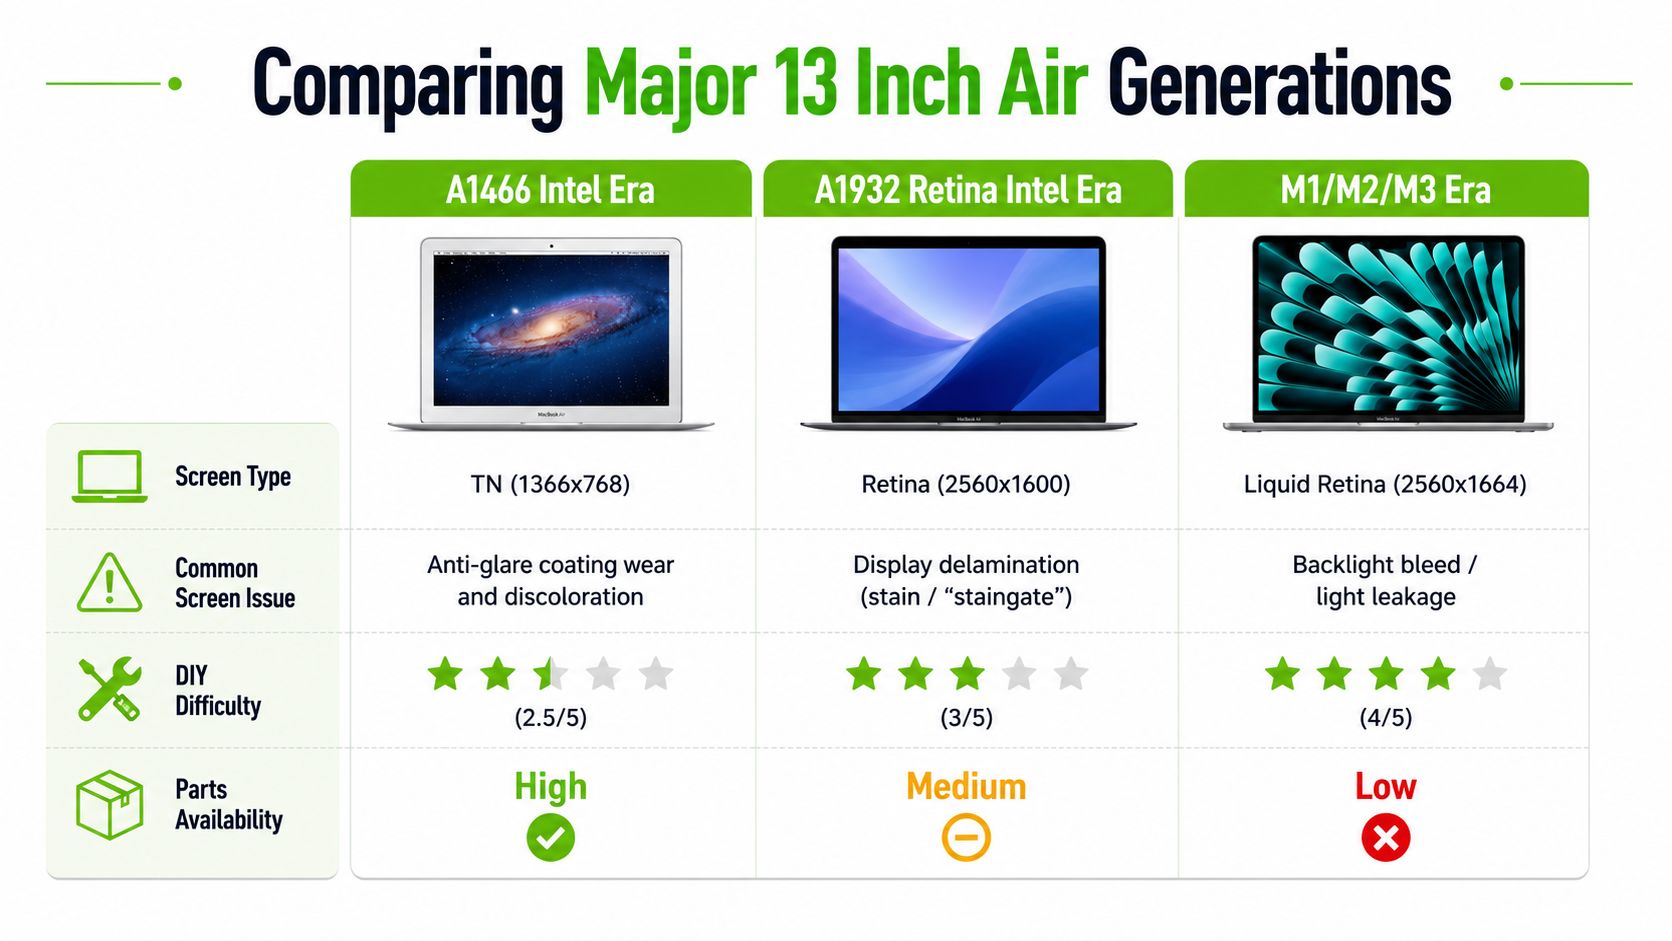
The families that matter are straightforward. There is the older A1466 Intel Air, the A1932 Retina Intel Air, then the M1 A2337, M2 A2681, and M3/M4 A3113 generations. Those machines do not share the same display hardware. They are different families with different mechanical fit, different cable layouts, and different expectations once the lid opens.
Exact model first, part second. If the identifier does not match, the screen assembly is wrong even if the listing says “fits MacBook Air 13-inch.”
Why the display assembly matters
Apple's current 13-inch Air display is not a bare LCD swap. It is a full top assembly with the panel, housing, camera, and related sensors built in, which is why parts matching is tighter than it used to be. That is the point repair sellers gloss over. The current display format is described in Apple technical specs, and the replacement parts have to match that assembly style, not just the screen size.
A near-match can still fail you. An M1-style display will not become an M2 or M3 screen because the glass size looks close on a listing photo. The notch, cable routing, and sensor integration changed. Buy by exact model family, or expect fit problems and feature loss.
That feature loss is what people miss. A wrong assembly can leave you with a panel that lights up but does not behave the way the original did, which is how you end up chasing problems that were avoidable at the ordering stage.
What to tell the seller
Ask for the exact model family, not a loose “13-inch Air” label. Then ask whether the assembly is new, used, or donor-pulled. If the answer sounds vague, stop there. A clean identifier saves more money than a cheap-looking listing ever will.
If you want the next repair to go smoothly, give the seller the model code first and the symptom second. The code decides the part. The symptom only explains why you need it.
What a 13 Inch MacBook Air Screen Replacement Actually Costs
A cracked or dead display on a 13-inch Air is one of those repairs where the model family decides everything. Older Intel machines could sometimes be fixed for a few hundred dollars, but modern M-series Airs cost more because the display assembly is more integrated and the parts carry a higher price. For older pre-2018 MacBook Air 13-inch units, a market guide places repairs around $179 to $299, while newer M-series Airs are usually quoted at $299 to $549 or more.
Breaking Down the Costs
A modern Air repair usually has three parts to the bill. The first is the display assembly itself, and that is the biggest charge. The second is labor, and many independent shops list installation separately instead of folding it into the part price. The third is shipping or sourcing overhead if the shop has to pull the assembly from an online seller instead of using stocked inventory.
On the M2 13-inch side, repair pricing commonly lands around $499 to $549, while Apple-authorized out-of-warranty service is often quoted around $450 to $650 depending on the model and service path price guidance. Another repair guide puts Apple-authorized work in a wider band, around $449 to $800, and notes that AppleCare+ can reduce the service event to a $99 fee.
If you are price shopping, ask whether the quote includes the complete assembly, labor, and post-repair testing. A part-only number is not your real total.
What that means in practice
Older Airs can still be worth repairing when the rest of the machine is in good shape. With newer M-series models, a screen job is usually a mid-hundreds decision, not a simple cosmetic fix. One UK repair guide lists M2 at £329.95, M3 at £349.95, and M4 at £369.95 for 13-inch Air screen repairs, which shows where this repair sits in major markets and why you should expect a mid-hundreds quote rather than a bargain.
If you already have AppleCare+, the calculation changes fast. If you do not, compare the repair quote against the machine's remaining useful life, not just the broken glass. That is where owners usually make the wrong call.
Comparing the Major 13 Inch Air Generations
The easiest way to buy the wrong screen is to treat “13-inch Air” as a single parts family. It isn't. The model name sounds close across generations, but the display assembly, connector layout, and the repair risk change enough that a near-match can turn into a dead-end.
Intel era versus Apple silicon era
The A1466 Intel Air is the older, more forgiving repair job. Parts still exist, but many come from donor machines or old stock, so condition matters as much as part number. The A1932 Retina Intel Air sits in the middle. It is newer, cleaner in design, and usually more expensive than the older non-Retina machines, yet it still does not share the same display behavior as the Apple silicon models.
The M1 A2337 starts the modern integrated design. The M2 A2681 moved to the notched 13.6-inch Liquid Retina assembly, and the M3/M4 A3113 family keeps that same general layout. The display spec you need to follow is the one for your exact machine family, not the marketing label that says 13-inch Air.
Don't buy the near-match
People can get burned here. A community answer on iFixit says an M2 or M3 screen may light up on a 2025 M4 MacBook Air, but you can lose True Tone, FaceTime camera function, and color accuracy because of firmware and connector differences. The same answer recommends the M4-specific screen if you want full functionality iFixit answer.
That is the compatibility trap. A display can fit, power on, and show an image while still being the wrong assembly for the machine. If you buy a used donor screen from the wrong generation, you can end up with a laptop that boots normally and still has missing camera features or broken color behavior.
My repair-shop ranking
Here is the order I give customers after I have identified the model family and checked the part path:
- A1466 Intel era, best when you already have a matching donor or the machine is cheap enough to justify hunting parts.
- A1932 Retina Intel era, workable if you can source the exact assembly and the chassis is otherwise clean.
- M1 through M4, buy the exact family part, no exceptions, because the compatibility margin is tighter and the cost of being wrong is higher.
Video reference for the repair layout and assembly differences, especially useful if you're comparing older teardown methods with newer Air designs.
Hidden Damage Behind a Cracked 13 Inch Air Screen
A cracked display is rarely just a cracked display. Impact travels through the lid, and the hinge area takes a beating even when the glass is the part you notice first. If the laptop fell corner-first or got squeezed in a bag, I assume secondary damage until I prove otherwise.
What the crack can hide
The most common hidden problems are mechanical. A hinge bracket can be bent, hinge screw posts can be stressed, and the opening angle can feel wrong even before the screen is removed. Antenna cables can also get pinched or torn where they route through the display housing, which creates a Wi-Fi problem that customers blame on “the screen” when the failure is the cable path.
There's also the electrical side. A damaged display connector or a stressed logic-board connector can keep a replacement assembly from behaving normally even when the new screen is fine. Speaker mesh and nearby components can take a hit too, especially after a hard drop.
A good diagnosis doesn't start with parts, it starts with inspection under magnification and a test on a known-good cable.
Why a proper estimate saves money
The right shop will not just quote the panel and call it done. It will inspect the hinge resistance, check the lid for distortion, and decide whether the job is a screen-only replacement or a screen-plus-hinge repair. That distinction matters because it changes both the labor and the chance of a repeat failure.
Apple forum posts about an M1 display repair have described a rough parts-plus-labor experience around US$500 when nothing else was wrong, with independent labor sometimes adding about US$75 to 150, but those are case-based examples, not universal pricing Apple discussion thread. The useful lesson isn't the exact figure, it's that the broken screen may not be the whole bill.
What I check before I order parts
- Hinge feel, because a stiff or loose lid usually means more than cosmetic damage.
- Cable path, because a torn antenna line can outlive the screen swap.
- Connector condition, because bent pins can kill a perfect replacement.
- Frame alignment, because a warped lid can destroy a brand-new assembly.
If a shop skips those checks, it's guessing. You don't want to pay for guesswork on a MacBook Air.
DIY Versus Professional Repair for the 13 Inch Air
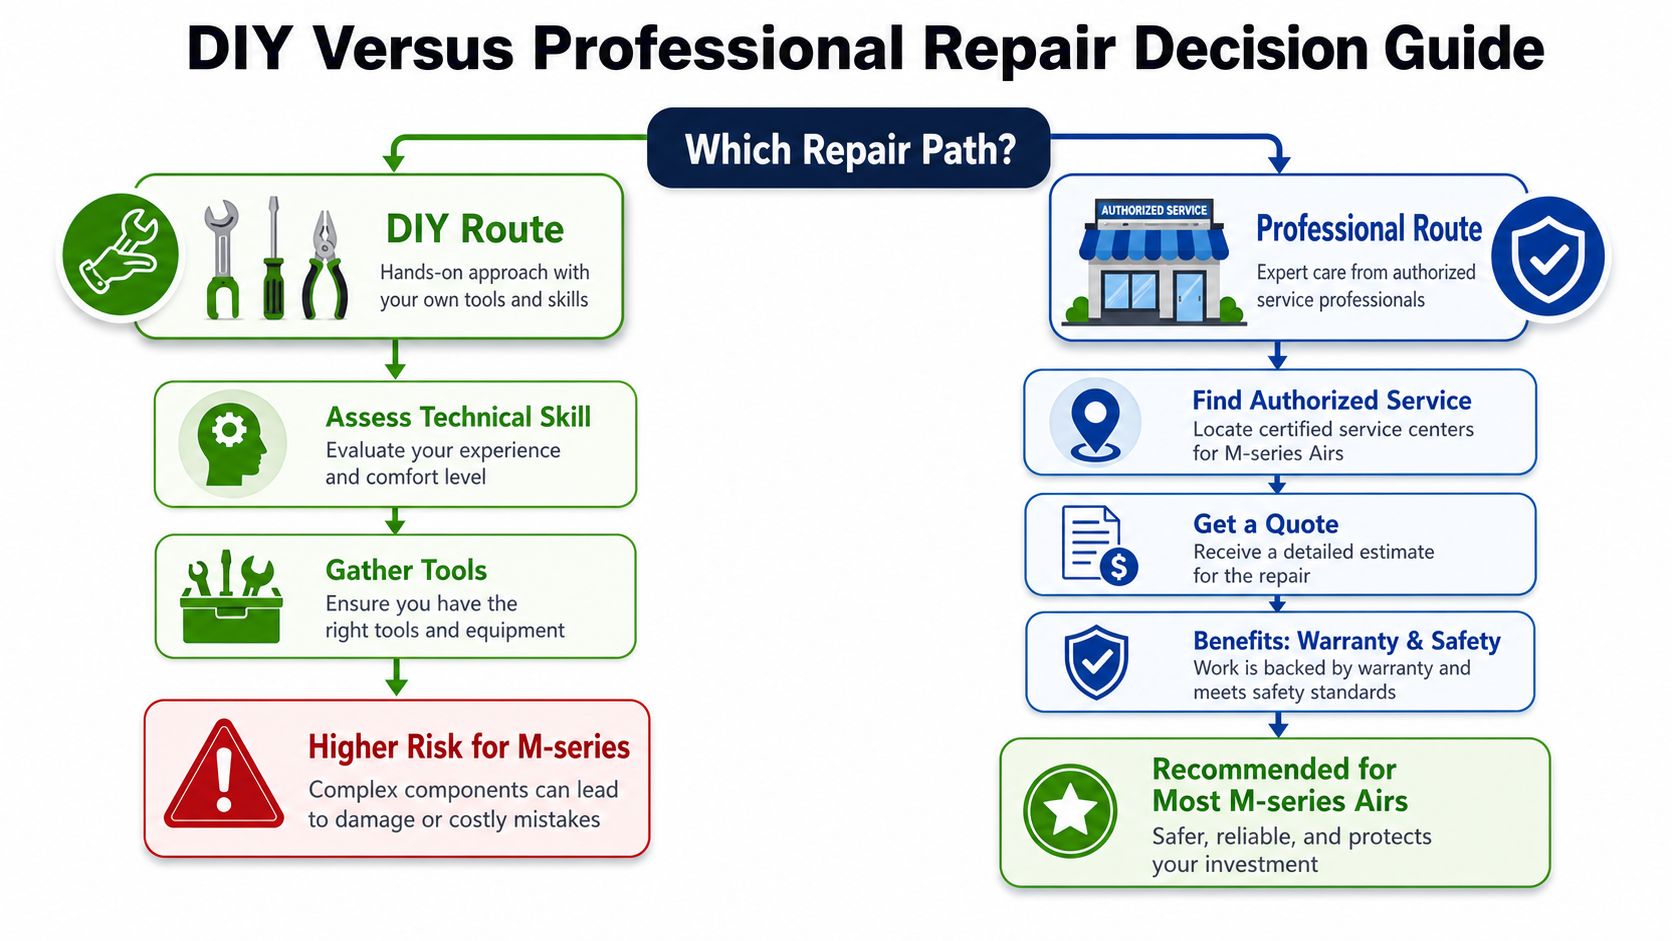
DIY screen replacement sounds cheaper until you look at the risk. On modern M-series Airs, the display is integrated, the routing is tight, and one bad move can turn a cracked screen into a dead Wi-Fi antenna or a broken connector. That's why I recommend professional service for most owners unless they already have proper tools and real teardown experience.
When DIY makes sense
DIY is reasonable if you've already opened Macs, you know how to handle fragile flex cables, and you have a verified, exact-match assembly in hand. You also need patience, good lighting, a precision screwdriver set, suction tools, and enough bench space to keep every screw organized. If you're buying from a donor or marketplace seller, confirm the part family before you touch the machine.
The hidden trap is post-install behavior. iFixit's 2020 guidance notes that after installing a replacement screen, the MacBook may not boot until it's connected to power, and that Auto Boot may need to be disabled before disassembly. That's the sort of detail generic repair blogs leave out, then owners panic when the machine doesn't wake up right away iFixit repair guide.
Why shops win on M-series jobs
Professional repair is the safer path for most owners because the technician can verify the model family first, source the correct assembly, and test the machine before and after the swap. The shop also has a better chance of spotting hinge damage, connector wear, or antenna issues before they become a second invoice.
Turnaround is another factor. Stocked in-house service can be fast, while Apple-authorized or parts-ordered repairs often take longer because the assembly has to be sourced and matched. If you're already losing work time, that delay matters as much as the dollar amount.
If you want a shop-side walkthrough of what professional Mac Air repair looks like across screens, batteries, and logic boards, this service overview from a Houston repair team is a useful reference point.
Warranty, AppleCare+, and Third-Party Coverage
A cracked MacBook Air screen gets expensive fast, and the coverage you have decides whether you pay a controlled service fee or the full cost of a display assembly swap. If AppleCare+ is active, that usually keeps the bill far more manageable. If it is not, you are choosing between Apple-authorized service, an independent shop, or a third-party plan you bought from someone else.
The three coverage layers to check
Start with the standard Apple limited warranty if the machine is still within it. Then check AppleCare+, because that is the plan that can reduce the screen-service charge. After that, review any retailer or insurer accidental-damage coverage, since those plans often have their own rules about approved parts, claim handling, and where the repair has to be done.
Authorized repairs are the safest route if you care about future coverage and part traceability. Independent shops still make sense when the machine is out of warranty or when you need the repair turned around quickly. The core question is not whether the screen can be replaced, it is whether the repair leaves you comfortable with the coverage situation afterward.
If the Mac still has warranty time left, ask exactly which part family will go in and whether the job could affect later claims. That one question prevents a lot of painful surprises.
My blunt recommendation
If AppleCare+ is active, use it unless the delay is a deal-breaker. If the Mac is out of coverage, compare the repair bill against the Air's remaining value and decide whether you want factory routing or faster local service. Third-party or used screens can work when they are matched correctly, but a mismatched display can create trouble later if you ever need Apple support again.
If you are shipping the machine or handing over a loose display assembly, use proper anti-static packaging. A practical place to find ESD protective mailers keeps the part protected in transit instead of letting a good screen get damaged before installation. The same caution applies to any repair handoff, because the wrong bag, box, or wrap can ruin a panel before it ever reaches the bench.
Your Pre-Repair Checklist Before Handing Over the Air
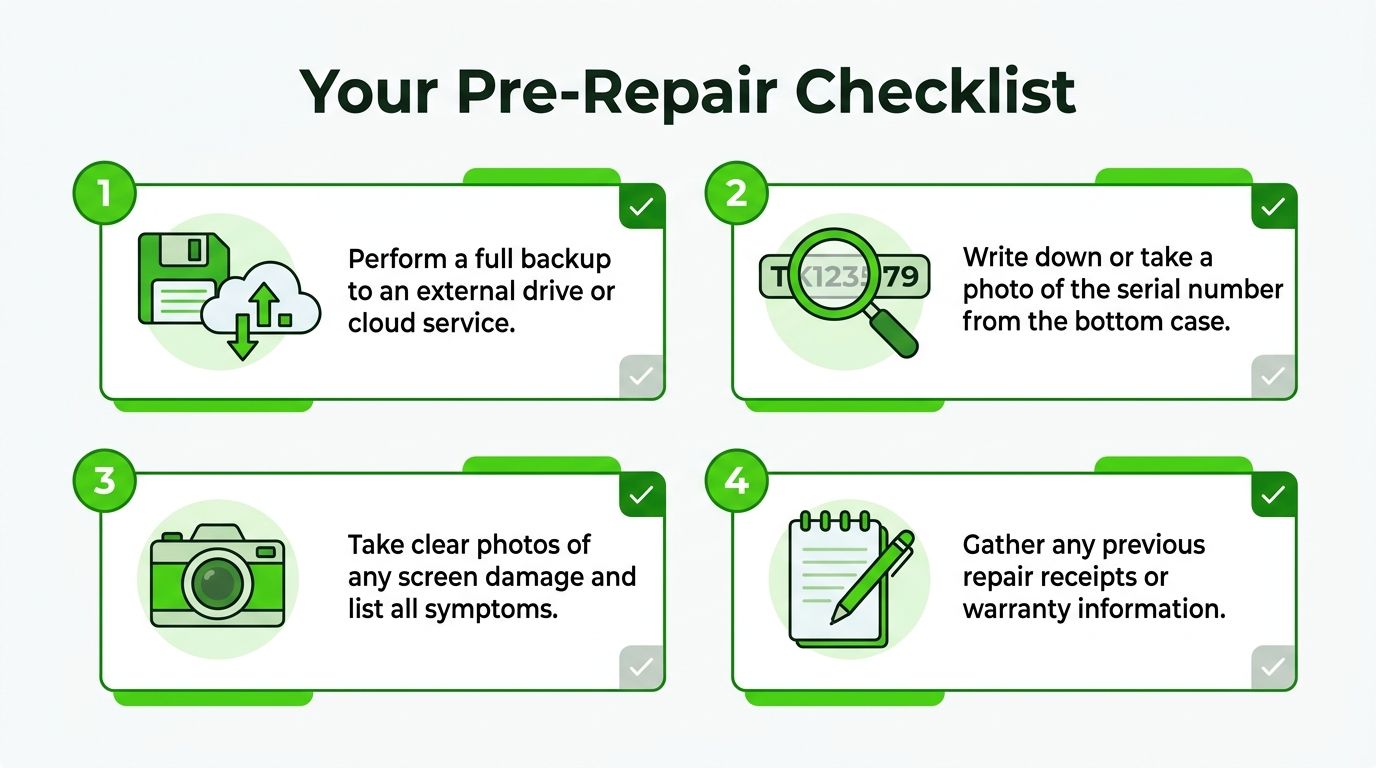
Do the boring steps before you hand the Mac over. Back up the machine, write down the serial number, and take clear photos of the damage from the front and the side. If the screen still lights up intermittently, record that too.
Ask these four questions
- Which exact model-family assembly will you install? You want the answer in model terms, not “it's the 13-inch one.”
- Does the estimate include hinge and antenna inspection? A cracked panel can hide more than glass.
- What's the warranty on the repair itself? If a shop won't stand behind the work, that's a warning sign.
- Will you test True Tone, the camera, and brightness after installation? On modern Airs, post-install functionality matters as much as getting the picture back.
For a broader pre-service reference that applies well to display jobs, this screen repair checklist guide is worth having open while you talk to a technician.
If you're trying to decide right now
Write down the model number, the damage symptoms, and whether the Mac still boots on external display or with the lid at a certain angle. If you're going DIY, confirm the exact assembly family, confirm your tools, and plan for the possibility that the machine won't behave normally until power is connected after the swap.
If your MacBook Air 13-inch screen replacement needs a clean diagnosis, exact part matching, or a straight answer on whether repair is worth it, We Fix PC Laptop handles Mac screen work, full assembly swaps, and the hidden damage that generic quotes miss. Bring the machine in, get a real assessment, and leave with a repair plan that fits the model, the budget, and the value of the laptop.