.svg)
.svg)
.svg)




How to Fix a Cracked Laptop Screen: DIY vs Pro Repair
You open your laptop expecting an ordinary workday and see a spiderweb of cracks across the display. Maybe the image is still visible behind the damage. Maybe black blotches spread from one corner, the backlight has vanished, or the screen stays blank while the laptop continues making startup sounds. Before you order a replacement panel, you need to answer the question most repair guides skip: does your laptop need a panel, or the entire display assembly?
That distinction controls the part price, the difficulty, the time involved, and whether DIY repair makes financial sense. A standard modular laptop may be a manageable screen swap. A thin ultrabook, touchscreen model, or premium MacBook-class machine may use bonded layers and require an assembly replacement that brings much more risk and expense.
Table of Contents
- Assessing the Damage and Your Options
- Diagnostic Checklist for Screen Damage
- DIY Replacement Versus Professional Repair
- Step-by-Step DIY Screen Replacement Process
- When Repair Is Not the Best Economic Choice
- Your Repair Decision Checklist
Assessing the Damage and Your Options
The first reaction is usually to close the lid and search for a replacement screen. Resist that impulse. A cracked display can be obvious, but the visible damage doesn't tell you whether the graphics hardware, display cable, digitizer, bezel, or complete lid assembly also needs attention.

Start by examining the damage with the laptop powered off. Look for fractured glass, black “ink-like” patches, vertical or horizontal lines, colored bands, uneven brightness, and areas that respond differently as you move the lid. Physical cracks and spreading dark patches usually indicate a damaged LCD or OLED panel, not a software problem. A bezel that has separated, a bent lid, or a loose hinge points toward a broader display assembly problem.
Separate the screen problem from the laptop problem
Connect the laptop to a known-working external monitor or television using an available video connection. If the external image is stable while the built-in display remains damaged, the motherboard and graphics path are more likely to be functioning, which narrows the repair toward the panel, cable, or lid assembly. If the external display shows the same visual fault, stop ordering screen parts until the laptop's hardware and software have been diagnosed.
A flashlight test can help with a blank screen. Shine the light across the display at an angle while the laptop is running. A faint image suggests that the computer may be producing video but the backlight system has failed. That result doesn't prove the panel is the only faulty component, but it gives a technician a useful direction.
Decide what kind of replacement you're facing
A panel-only replacement is realistic when the laptop has a separately mounted LCD, accessible screws, and a plug-in display connector. Some models expose four corner screws and allow the panel to be removed without separating the entire lid.
An assembly replacement becomes more likely when the glass, digitizer, LCD, bezel, and adhesive are integrated. Thin-bezel ultrabooks and touch-enabled designs often use bonded layers, so replacing only the visible glass isn't a practical repair. The correct part may be sold as a complete display module.
Record the exact model identifier from the bottom case or system information screen. Similar-looking laptops can use different resolutions, connectors, mounting points, and touch hardware. Ordering by screen size alone is one of the quickest ways to receive an incompatible part.
Diagnostic Checklist for Screen Damage
A disciplined diagnosis prevents two expensive mistakes, ordering the wrong component and replacing a working part. Work through the symptoms before opening the chassis.
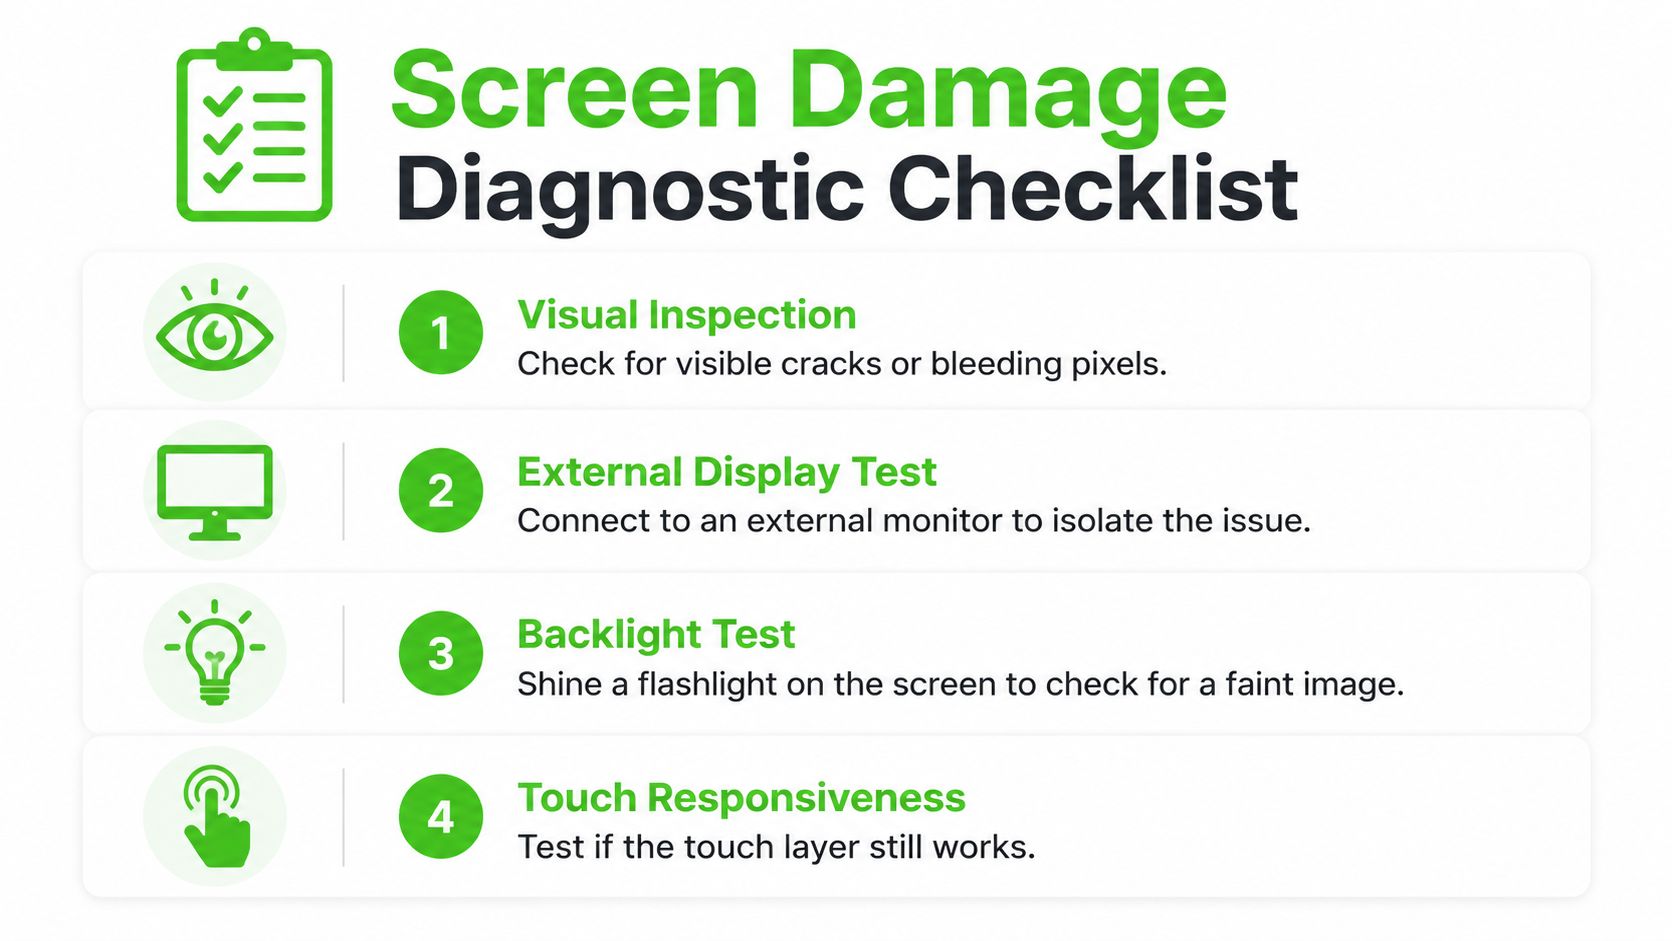
Start with a visual inspection
With the laptop shut down, inspect the display from edge to edge. A physical fracture, black spreading area, or broken corner confirms panel damage. Also inspect the bezel clips, hinge covers, lid, and webcam area because impact can damage the surrounding structure even when the main symptom appears to be a cracked screen.
If the display has no visible impact damage but shows flicker, discoloration, lines, or intermittent output, the panel may be defective, but the cable or connector could be responsible. Gently changing the lid angle can reveal a cable or hinge-related fault, but don't bend the lid repeatedly. You can worsen a damaged connection.
Use an external display as an isolation test
An external monitor is the most useful home check before purchasing parts. A clean external image points toward the laptop display system. A matching fault on both displays points away from a simple panel replacement and toward the graphics hardware, motherboard, or software environment.
Save your files before further testing if the laptop still starts normally. A screen repair shouldn't put your data at risk, but opening any device creates an opportunity for accidental damage.
Check backlight and touch behavior
A faint image under a flashlight indicates a possible backlight failure. A completely black panel with no faint image can involve the panel, cable, connector, or board-level power circuitry. Don't assume a replacement LCD will solve every blank-screen fault.
On a touchscreen, test touch input across the usable area. A cracked image panel with working touch may still require the same full assembly if the digitizer is bonded to the display. If touch is unresponsive or produces random input, the digitizer may also be damaged.
Confirm the part design before buying
Search the exact model-specific service procedure and compare the replacement part photographs with your laptop. Look for connector position, mounting tabs, cable type, touch support, and whether the listing describes a panel or a complete assembly. The notebook screen repair checklist can help organize those checks before you disassemble anything.
Technician's rule: If the listing doesn't clearly identify the panel specifications and assembly type, don't buy it yet. Compatibility matters more than a low part price.
DIY Replacement Versus Professional Repair
DIY repair works best on a standard non-touch laptop with a modular panel, visible fasteners, and a replaceable cable connection. It becomes a different job when the display is bonded, the bezel uses aggressive adhesive, the hinges attach through the display module, or the chassis requires extensive internal disassembly.
Typical professional pricing reflects those differences. Standard non-touch laptop screen repairs commonly fall around $120 to $350, while touchscreen, gaming, and premium MacBook-class assemblies can reach $400 to $900 or more because bonded glass, digitizers, tight tolerances, and labor increase the total cost, as outlined in this laptop screen repair cost guide.
| Device Type | DIY Cost | Pro Repair Cost | Time Required | Risk Level |
|---|---|---|---|---|
| Standard non-touch modular laptop | Part cost varies by model | $120 to $350 | Shorter when the part is available | Moderate |
| Touchscreen laptop | Part or assembly cost varies by model | $400 to $900 or more | Longer because bonded layers complicate handling | High |
| Gaming laptop | Part cost varies by model | Often above ordinary laptop pricing | Depends on bezel, hinge, and assembly design | Moderate to high |
| Premium MacBook-class laptop | Assembly cost varies by model | $400 to $900 or more | Often more involved than a basic panel swap | High |
The DIY price isn't just the replacement part. Include precision drivers, plastic opening tools, adhesive supplies, shipping, and the cost of a failed repair. A part that looks affordable can become poor value if one torn cable or broken bezel turns the job into a second purchase.
A professional repair gives you diagnosis, part matching, controlled disassembly, and post-installation testing. It also makes more sense when the laptop is used for work, contains important data, or has a bonded display that you haven't previously opened. For touch and OLED designs, compare the risks and economics in this touchscreen and OLED repair guide.
Step-by-Step DIY Screen Replacement Process
Once you've confirmed that the display part is correct and the chassis is suitable for DIY work, protect the replacement panel before you begin. Work on a clean, flat surface, keep screws organized by location, and photograph cable routing before removing anything.
1. Shut down and isolate power
Perform a complete shutdown, unplug the charger, and disconnect or disable the internal battery before touching the display connector. Sleep mode isn't enough. A live battery can send power through the display circuit while you're working.
Use the correct precision tools. Many laptops use T5 or T6 Torx drivers, while others use Phillips #0 or #1. Screen fasteners can be small, with common mount screw lengths in the 2.5 to 5.9 mm range, so don't substitute a longer screw or force a driver that doesn't fit. The repair sequence and connector precautions are illustrated in this Surface Laptop 4 screen replacement procedure+Screen+Replacement/157195).
2. Release the bezel without attacking the panel
Remove visible screws and use a plastic pick to release bezel clips gradually. Start at a corner or seam designed for separation, then work around the frame. Metal prying tools can gouge the lid, snap clips, or slip into the panel edge.
If adhesive holds the bezel or display, use the model-specific method for softening and separating it. Don't pull the bezel away aggressively. Thin frames flex easily, and the replacement panel can crack before it ever reaches the connector.
3. Remove the old panel and cable
Support the display while removing its mounting screws. Lift the LCD straight up only after the connector latch, tape, or adhesive has been fully released. The eDP or LVDS cable is delicate, and dragging the panel while it remains attached can tear the cable or damage its socket.
Inspect the replacement part beside the old one before installation. Confirm the connector location, mounting holes, cable orientation, and any brackets or tabs. If those features don't match, stop and resolve the compatibility issue rather than improvising.
4. Connect, test, and then finish the assembly
Attach the display cable firmly and reseat its retaining tape or latch. Keep the cable in its original guides so the hinge won't pinch it when the lid moves. Secure the panel loosely at first, then check alignment before tightening the fasteners.
Power on the laptop while the bezel remains off. Test image output, brightness, viewing angles, touch if equipped, webcam operation, and lid movement. Flicker, backlight loss, or no image often results from a connector that isn't fully seated or a cable that has been routed incorrectly.
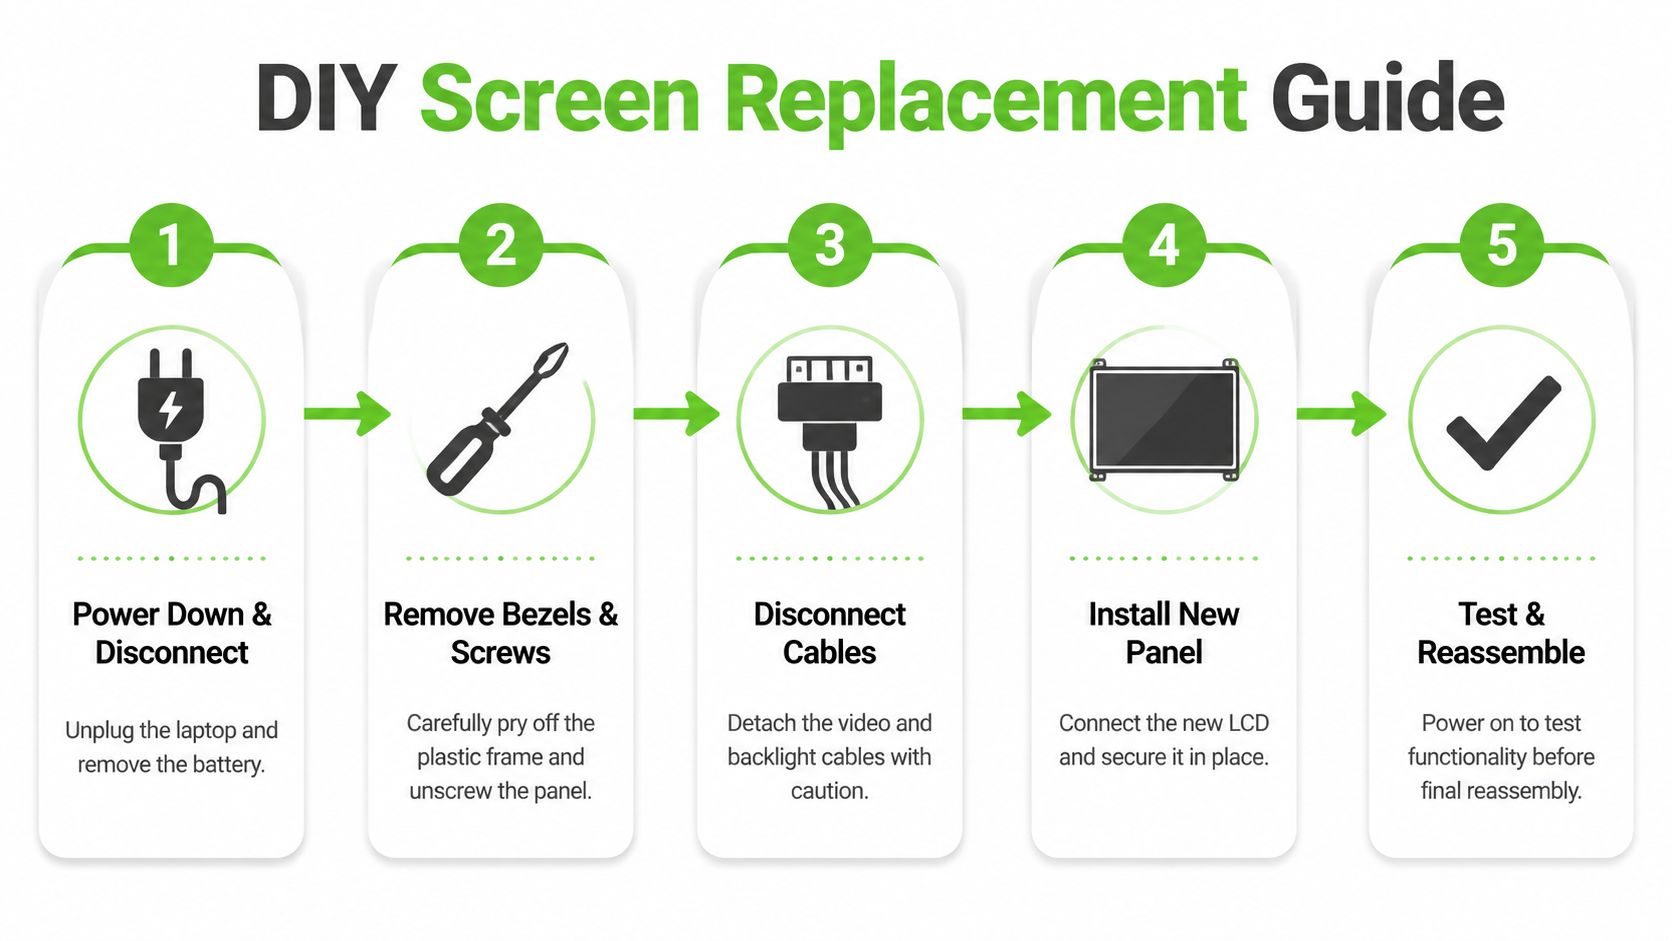
After the test passes, shut down again before final reassembly. Refit the bezel or adhesive strips carefully, check that no cable is trapped, and tighten screws without over-compressing the display.
When Repair Is Not the Best Economic Choice
A cracked screen doesn't automatically justify a screen replacement. The decision depends on the laptop's age, condition, remaining usefulness, resale value, and the type of display assembly it needs.
For a standard laptop, a professional repair often stays within the $120 to $350 range, while a premium or touchscreen assembly may rise to $400 to $900 or more, according to the cost guidance cited earlier. The relevant comparison isn't just repair price versus the laptop's original purchase price. Compare the repair bill with the machine's current value and the cost of obtaining a replacement that meets your actual needs.

Use a practical break-even test
Repair generally deserves serious consideration when the laptop has adequate performance, the battery and hinges are healthy, the screen part is readily available, and the repair leaves meaningful usable life. It becomes harder to justify when the device already has several unrelated faults, replacement parts are scarce, or the display assembly approaches the machine's present value.
Don't rely on the glass appearance alone. A full assembly may include the panel, digitizer, bezel, hinge covers, camera hardware, and adhesive layers. A quote that seems high may reflect the correct integrated part rather than unnecessary labor.
Account for warranty and downtime
Check warranty coverage, accidental-damage protection, and any service agreement before opening the laptop. DIY disassembly can affect warranty service, and bonded displays are poor candidates for experimentation. Authorized service may be the safer route for a covered premium device, particularly when proprietary assembly construction makes third-party parts uncertain.
Downtime also has an economic cost. A quick local diagnosis can be more practical than waiting for multiple parts, attempting a repair, and discovering that the cable or lid was damaged too. Use this repair versus buying decision guide to frame the choice around the laptop's condition rather than the crack alone.
If repair doesn't make sense, protect your data before replacing the machine. Use an external monitor temporarily when possible, back up important files, and don't discard a functional computer just because its built-in display failed. A laptop with a dead screen may still have useful storage or other components, provided the rest of the system is confirmed healthy.
Your Repair Decision Checklist
Use this checklist before spending money or opening the case:
- Confirm the fault: Test the laptop with an external display and determine whether the built-in panel, cable, backlight, touch layer, or graphics hardware is involved.
- Identify the part type: Verify whether your model accepts a panel-only replacement or requires a complete display assembly.
- Match the exact model: Check connector position, resolution, mounting points, touch support, and cable routing against the replacement listing.
- Assess the chassis: Look for accessible screws and modular construction. Bonded glass, adhesive, hinge separation, and fragile bezels raise the risk.
- Price the complete job: Include the part, tools, shipping, labor, and the cost of a failed attempt.
- Consider the laptop's condition: A healthy standard machine may justify repair. Multiple existing faults or a weak resale position may favor replacement.
- Choose your route: DIY suits careful owners with the right tools and a compatible modular design. A professional diagnostic is sensible for premium, touch, OLED, or structurally damaged laptops.
- Test before closing: Confirm image, brightness, touch, webcam, cable stability, and hinge movement before reinstalling the bezel.
Keep the repaired laptop on a stable surface, open and close the lid from the center, and avoid carrying it by the display. Those habits reduce stress on the panel, bezel, cable, and hinges.
If you're unsure whether your laptop needs a panel or a full display assembly, We Fix PC Laptop can diagnose the damage, identify the repair path, and provide an upfront estimate for PC and Mac systems. Visit We Fix PC Laptop to arrange a screen evaluation and discuss whether repair is more sensible than replacement.
- Comprehensive Laptop Screen Repair Guide: 2026 Professional Solutions
- Laptop Repair or Replacement? How to Decide Before Spending Hundreds of Dollars
- Protect Your Display: Essential Habits to Prevent Laptop Screen Damage
- OLED and Touchscreen Laptop Repair vs. Replacement: A Cost-Benefit Guide
- Emergency Laptop Screen Repair in Houston: What to Do When Your Screen Breaks
- Top-Rated Computer Repair Shop In Texas: We Fix PC Laptop
- Expert Computer Repair Technician for Managed IT Services in Houston